
The Xerox Nuvera EA Digital Production System uses EA dry ink only. The EA (Emulsion Aggregation) dry ink is a latex-based material that flows easier than conventional dry ink, resulting in less toner being used to provide the same density print. It offers a smoother, flatter laydown of dry ink surface that also creates a very high quality print.
When the machine has reached the limit set for the dry ink container, an alert will appear in the system messages portion of the user interface. Double-clicking the alert will launch a new window, giving details about the action needed.
The Xerox Nuvera EA Digital Production System has 2 dry Ink containers. Each container lasts up to approximately 200,000 images. You can replace the empty container while the system is running since approximately 10 minutes worth of dry ink is available for continued printing.
The procedure for changing the dry ink is the same for both containers.
CAUTION! |
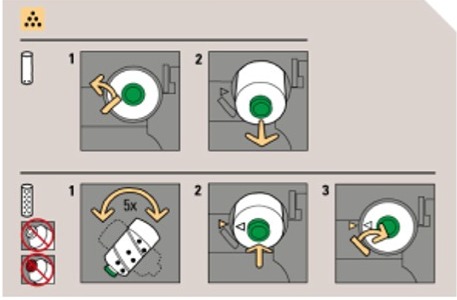
The label on the inside of the left print engine door indicates the toner type to be used based upon the cap and label color. It also shows how to remove and replace a dry ink cartridge.
Double-click the system alert to see the location of the Dry Ink Container, details on the action needed, and instructions on how and where to return the used Dry Ink Container.
See Contacting Xerox to get the correct part number for this Dry Ink Container.
NOTE: If you install an invalid dry ink cartridge, a fault code will ask you to "remove the invalid toner container". |
![]()
© Copyright 2007
Xerox Corp.
All Rights Reserved.
|
| |
| |
| |
| |
|||||
|
| |
| |
| |
