Replacing Staples in the Finishers
Depending on your system's finisher configuration, refer to the appropriate
sections below.
Systems with Basic Finishing Modules (BFM)
See Replacing Staples in the BFM for information on staple replacement.
Systems with Multi-Function Finishers (MFF)
There are two stapler mechanisms in the Multifunction Finisher (MFF):
- Main Tray Stapler
- Booklet Tray Stapler
When the Xerox Nuvera
has used all of the staples in either of the staplers, an alert will appear
in the system messages portion of the UI.
 |
NOTE: The Main Stapler cartridge must
be completely empty before you can remove the old container. |
To replace staples
Double-click the system alert to see details on the action needed, as well
as the location of the stapler needing attention.
See Contacting Xerox to get the correct part number
for this CRU.
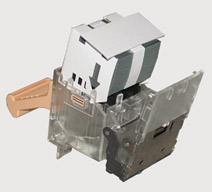
Main Tray Stapler
- Once you have identified the location of the stapler, open the access
panel and locate the stapler housing. It is identified with a pictorial
representation of a staple.
- Grasp the stapler housing drawer handle and pull out towards you.
- Grasp the stapler cartridge handle. To remove, move it upwards, then pull
out the entire cartridge.
- Turn over the completely empty stapler cartridge. With a slight pinching
motion, release the cartridge cover. It will swing away, exposing the empty
staple stack container.
- Take note of the way the container is housed in the cartridge. Grasp the
white handle of the container, and pull it out of the housing. Discard this
cardboard container.
- Slide the new staple stack into the cartridge. Remove the white retainer
strip.
- Swing the cartridge cover back up into place.
- Slide the stapler cartridge back into the drawer.

Full cartridge
Ready to load position - note position of new staple cartridge.
Booklet Tray Stapler
- Rotate the handle (Area 2) to the up position.
- Access the Booklet Stapler by pulling out the Booklet folding drawer (Area
4) in the MFF.
- In the lower right area of the drawer, swing out the mechanism by grasping
the green handle. You should now see the twin stapler heads.
- Grasp one of the staple head assemblies, and with a slight pinching action,
pull out the empty staple cartridge.
- Replace with a new cartridge. Contact Xerox to
order this consumable part.
|
NOTE: Before inserting new cartridge, remove the
small orange clip. It is there to ensure the staples remain in the
housing during shipment/handling.
|
- Repeat #4 and 5 for the second stapler cartridge.
- Close the Booklet folding drawer (Area 4) in the MFF.
- Rotate the handle (Area 2) to the down position.

