Remove and Reinstall the Required Color Drum Cartridge (Imaging Unit) Associated With the Problem
- Product support for
- VersaLink C400 Color Printer, VersaLink C405 Color Multifunction Printer
- Article ID
- KB0129139
- Published
- 2019-03-06
The Imaging Unit includes a single Imaging Unit. Only replace the Imaging Unit when told to replace the unit for a specific reason.
NOTE: The Imaging Unit Kit has a yield of approximately 60,000 pages; this can vary depending on type of use / coverage.
CAUTION: Do not use warm water or cleaning solvents to remove Toner (Dry Ink) from your skin or clothing. This will set the Toner and make it difficult to remove. If any Toner gets on your skin or clothing, use a brush to remove the Toner, or wash it off with cold water and mild soap.
For additional product and material safety information, click Xerox Environment, Health and Safety under the Related Content.
NOTE: The images provided are for demonstration purposes only. Your printer may vary slightly from the images provided.
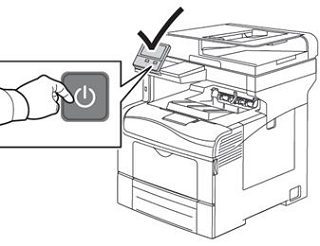
Power off the printer. See the Related Content section for additional information.
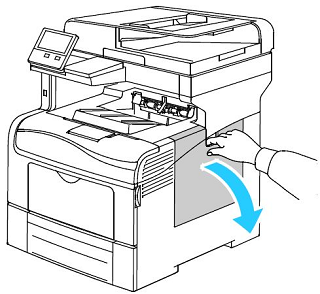
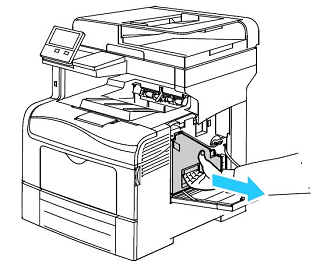
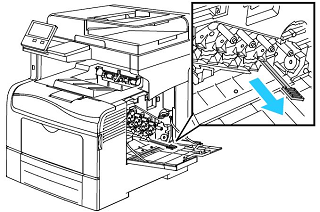
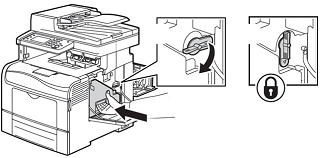
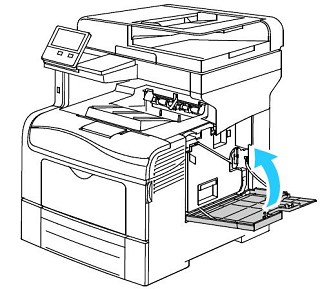
Open the Right Side Door.
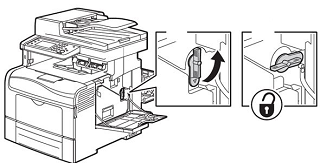
On the right side of the printer, unlock the Waste Cartridge, rotate the lever 90-degrees to the left.
Grasp the handle of the Waste Cartridge, then pull the cartridge out of the printer. To prevent Toner spills, keep the openings in the cartridge, face-up. Place the Waste Cartridge on a level surface.
NOTE: Be careful not to spill Toner when handling the Waste Cartridge. After removing the cartridge, do not touch the Toner port.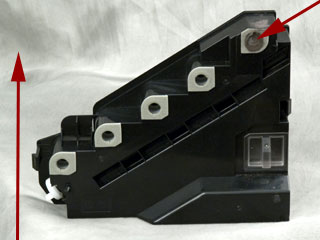
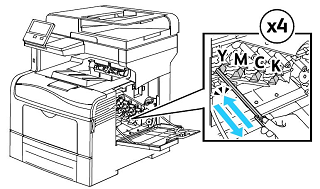
CAUTION: To avoid Toner spills or malfunction, do not place the Waste Cartridge on the side.Locate the required Imaging Unit. From top to bottom, the imaging units are Y (Yellow), M (Magenta), C (Cyan), and K (Black).

For the required Imaging Unit:
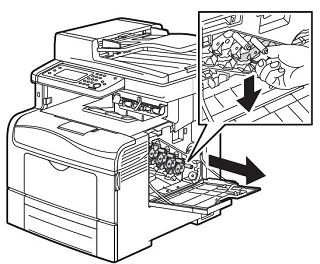
Grasp the tab, push down, and pull the unit straight out of the printer.
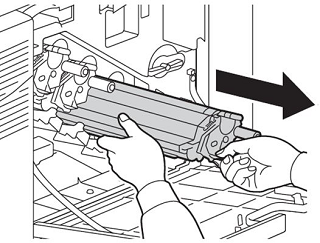
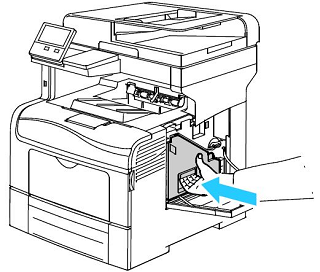
Push the Imaging Unit into the printer until the unit clicks into place.
CAUTION: Do not touch the top of the Imaging Unit. Do not expose the unit to light for more than 5 minutes.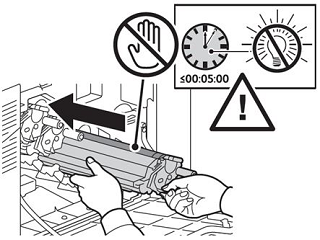
Remove the cleaning rod located below the black Imaging Unit inside the printer. This cleaning rod is used to clean each of the four laser lenses, one for each color.
NOTE: There are four holes, one for each laser lense. There are four cleaning holes; one hole for each Toner (Dry Ink) color. From the front of the printer to the back, the corresponding colors are Yellow (Y), Magenta (M), Cyan (C), and Black (K).Insert the cleaning rod into one of the four cleaning holes until the rod clicks into position, then pull the rod out. Repeat this two more times.
Repeat the cleaning process for the other three holes.
Return the cleaning rod to the original location.

Reinsert the Waste Cartridge.
To lock the Waste Cartridge, rotate the lever 90-degrees to the right. When the lever is vertical, the cartridge is locked in position.
Close the Right Side Door.
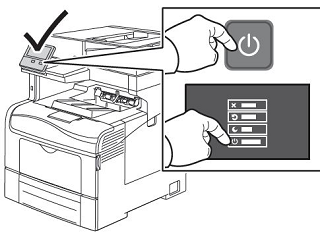
Power on the printer. See the Related Content section for additional information.