
Paper Tray Programming
When you load paper in a paper tray, you must program the tray for the paper it contains.
To avoid loading a paper stock unsupported by the machine, see Recommendations for Paper Usage.
For details on paper handling and storage, see Handling and Storing Paper.
For details on loading special papers, see Loading Special Stock For Proper Finishing Output .
CAUTION! |
Tray Confirmation Options
When you change or add paper to a feed tray, you need to program the tray for the stock you added. To avoid "Resource Not Available" faults, you can set a confirmation option to match your workflow. The confirmation box displays asking you to confirm or change the paper setting for a tray.
To set a Confirmation option
- Select Setup from the Menu bar.
- Select System Preferences: Stocks and Tray tabs.
- Under Tray Confirmations select a Confirmation Option.
- None - No Confirm box is displayed (Production System Default).
- When Tray Settings Change - Confirm box displays if you add a different sized stock and do not change tray programming.
- After Every Tray Cycle - Confirm box display each time a tray is opened and closed (Copier/Printer default).
- Auto Accept Settings Changes - No Confirm box is displayed as the system automatically senses the new stock size. You may need to change other stock attributes based upon the stock you added to the tray.

TIP: When programming a stock in a feed tray or the stock library it is important to set the correct stock properties, especially the weight listed as gsm. Based on the weight of the stock (gsm) setting, the feed tray 'fluffers' settings are modified to feed the programmed stock.
Taking time to verify the gsm setting increases runtime and productivity by decreasing feed module paper jams.
- None - No Confirm box is displayed (Production System Default).
To program paper trays
Tray programming procedures vary depending on how you configure confirmation alerts and on the particular Nuvera System.
Load and Program Method for the Copier/Printer
- When the Tray In Use light turns off, open the tray you wish to load.
- Load paper stock.
- Push the tray closed.
- For fully-adjustable trays, a "Confirm Tray Contents" alert window will appear. Either Confirm the tray contents, or click Change to enter the correct stock size/type.
- For dedicated trays, a "Dedicated Tray Contents" alert will appear.
- Either make appropriate changes in the Tray Properties window (Fully Adjustable trays) or re-load the correct paper (Dedicated trays).
|
NOTE: When entering the size of Catalog Envelopes, enter the dimension of the envelope with the flap open. See Recommendations for Paper Usage for more information, as well as a listing of all paper types the system will work with. |
NOTE: Trays are identified as "Fully Adjustable" and "Dedicated" in the Tray Type column of the Paper Trays tab. |
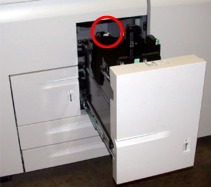
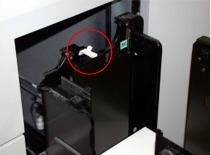
Rear Guide Stop for Tray 2 on the 4-Tray Feed Module
The Tray 2 Rear Guide Stop is designed for systems that dedicate tray 2 on the 4-Tray Feed Module for 8.5” x 11" or A4 stock. It is designed to stabilize the rear guide in the tray improving registration. The stop is installed in the back of the tray to restrict the rear guide from opening. The stop is set for 8.5” x 11" stock and is in the disabled position when the machine is shipped. The user can Enable the stop by rotating the gray colored lever to the right or Disable the stop by lifting and rotating the lever to the left.
 |
 |
 |
Located in back of tray |
Enabled |
Disabled |
NOTE: If A4 stock is to be loaded in tray 2, service must be called to adjust the lever. |
Program and Load Method for all Systems
- Click Printer Manager. For more information, see Managing the Printer.
- Double-click or right-click a fully adjustable tray row. A Tray Properties window appears.
- Enter all choices pertaining to the stock you wish to load into the tray. The Digital Production System has stock library from which you can select a stock to program the tray. Click <OK> or <Apply>.
- Open the fully adjustable tray you just configured, as identified in the Tray Type column of the Paper Trays tab.
- Load stock that matches the settings you made in the Tray Properties window.
- Close the tray.
NOTE: It is only possible to Program and Load fully adjustable trays. Only System Administrators can change Dedicated tray programming. |
To enable a tray
- Right click one the tray in the Paper Trays tab.
- Click Enable Tray from the Tray pull-down menu.
To disable a tray
If a tray is broken, in need of service, or you do not want it used for some reason, you can disable it.
- Right click one of the trays in the Paper Trays tab.
- Click Disable Tray from the Tray pull-down menu.
About Auto Tray Switching and setting tray priorities
The Xerox Nuvera is designed to allow a job to be submitted using only job attributes, and the system will then, based upon tray priorities, pull stock from the tray(s) containing the programmed stock.
You have the ability to control the order in which trays are used by the system, by setting each tray' priorities. For example, if trays 1 and 2 contain the same type of paper, but you are running a big jobs, you can set tray 2 to be chosen first, since it has a larger paper capacity. In this case, the job pulls stock from tray 2 first. When tray 2 is out of stock, the job switches to pull from tray 1. Once tray 2 is refilled, the job switches back to pulling stock from tray 2.
Feed Until Empty
A user selected workflow, Feed Until Empty, tells the system to empty the second tray before switching back to the original tray. In the above example, once the tray 1 was empty, the job switches to pulling stock from tray 2 and remain pulling stock from that tray until it is empty. Once the 2nd try is empty the job immediately switches back to the 1st tray, if it has be refilled.
To select Feed Until Empty
- Select System: User Diagnostics: Feed System Optimization Customer Setup: Feed Until Empty Algorithm to enable Feed Until Empty.
|
NOTE: To find out at a glance the priority setting of each paper tray, look on the far right-hand side of the Paper Trays table in the Printer Manager. The last column on the right shows the current Priority setting for each tray. |
To set tray priority
- Click the Printer Manager button.
- On the Paper Trays tab, double-click a paper tray you want to set.
- The Tray Properties window for that tray appears. Click the Options button.
- Click in the Tray Priority textbox and enter a lower number (the lower the number, the higher the tray priority).
- Repeat Steps 2-4 to check that the other trays are assigned priority numbers which will cause the system to use them in the order you want.
- When satisfied with the priority settings on each Tray Properties window, click <OK>.
|
NOTE: It is possible to configure your Xerox Nuvera with two or more Feed Modules (FM), effectively doubling the feed capacity of the system. Notify your Xerox sales representative if you wish to configure your system in this way. See Feed Module for more details. |
|
NOTE: If your Xerox Nuvera is configured with two or more Feed Modules, pay special attention to how the trays are displayed in the user interface. For example, tray 2 in the first FM will appear as "Feeder 1; Tray 2". Tray 1 in the second FM will appear as "Feeder 2; Tray 1." |