Remove Paper and Other Obstructions From the Paper Path
NOTE: To avoid damaging the printer, always remove misfed media carefully, without tearing it. Try to remove the paper in the direction that the paper would normally feed. Any piece of media left in the printer, whether large or small, can obstruct the media path and cause further misfeeds. Do not reload media that has misfed.
CAUTION:Do not use warm water or cleaning solvents to remove Toner (Dry Ink) from your skin or clothing. This will set the Toner and make it difficult to remove. If any Toner gets on your skin or clothing, use a brush to remove the Toner, or wash it off with cold water and mild soap.
WARNING: The Fuser Assembly and surrounding area may become hot during operation. To avoid injury, be careful while working in this area.
Clear Paper Trays 1, 2, 3, and 4:
- Check the jam message on the Touch Screen before opening the paper tray. If there is a paper jam inside the printer, clear the jam inside the printer first.
- Pull out the paper tray where the paper jam occurred.
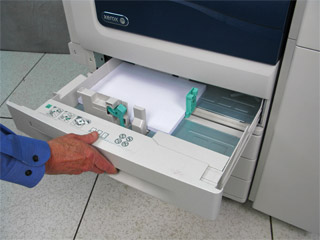
- Remove any jammed paper. If paper is torn, remove the tray completely and check inside the printer for torn pieces of paper.
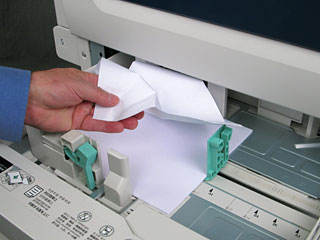
- Reload the tray with undamaged paper, and make sure the paper edge guides are positioned correctly against the paper.
- Push the tray in until it stops.
- Make sure the paper tray settings displayed on the Touch Screen are correct. If the settings are correct, then select the Confirm button. If the paper tray information is incorrect:
- To select a new paper size, touch Size.
- To select a new paper type, touch Type.
- To select a new paper color, touch Color.
- To confirm the settings, touch Confirm.
Clear the Paper Jam Behind the Top Left Cover A:
- Remove any paper in the Left Tray, then fold up the tray.

- Open the Bypass Tray (Paper Tray 5), located on the left side of the printer, by rotating it outward.
- Lift up on the release lever on the Top Left Cover A to open the cover.

NOTE: Do not touch the Transfer Belt. This could reduce image quality or damage the belt. Do not touch the Transfer Roller. This could reduce image quality. - If paper is jammed at the exit to the Output Tray, remove the paper by carefully pulling it straight out.

NOTE: Toner may adhere to the Transfer Roller. This will not affect print quality. - Remove any jammed paper in the Top Left Cover A area. If the paper is torn, remove all torn pieces from the printer.

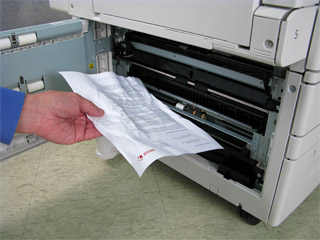
- If paper is jammed in the Fuser area, pull the green A1 lever, and then carefully remove the paper.

- When finished, return the green lever to its original position.
- Close the cover, and then close the Bypass Tray.
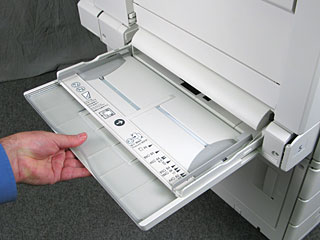
Clear the Paper Jam Behind the Bottom Left Cover C:
- Pull the release lever and open the Bottom Left Cover C of the machine.

- Remove any jammed paper in this area. If any paper is torn, check for any torn or damaged pieces of paper inside the machine.
- Look inside the printer to check for jammed paper in the upper position. If paper is jammed in the tray feed roller, open the tray to remove the paper.
- Close the cover.
Clear the Paper Jam Behind the Top Left Cover D
- If necessary, remove paper from the Top Left Tray, and then fold up the tray.
- Open the Bypass Tray (Paper Tray 5), located on the left side of the printer, by rotating it outward.
- Lift up on the release lever on the Top Left Cover A to open the cover.
- Open the Left Tray and then open the Top Left Cover D.

CAUTION: Do not touch the Transfer Belt. This could reduce image quality or damage the belt. Do not touch the Transfer Roller. This could reduce image quality. - Remove any jammed paper in this area. If the paper is torn, remove all torn pieces from the printer.

- Close Cover D, and then close Cover A.
- Close the Bypass Tray.
Clear the Paper Jam in the Duplex Unit (B) Area
- Open the Bypass Tray (Paper Tray 5), located on the left side of the printer, by rotating it outward.
- Lift up the lever and open the Duplex Unit (Cover B).

- Remove any jammed paper in this area. If the paper is torn, remove all torn pieces from the printer.

- Close the cover, and then close the tray.