Connect the Phaser 3635MFP to an Ethernet Network Using TCP/IP
- Product support for
- Phaser 3635MFP
- Article ID
- KB0046983
- Published
- 2015-09-17
NOTE: Before connecting the Phaser 3635MFP to the network, make sure the other machine functions (such as copying) are operating correctly.
Step 1: Test the machine:
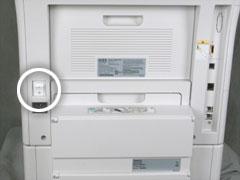
If the machine is not already powered on, press the power switch to the [|] (on) position. The power switch is located at the rear of the machine.

Place a document in the Document Feeder and make two or three copies.
Perform one of the following depending on the result:
If the copies are made successfully, connect the machine to the network as described in the steps below.
If the copies are not made successfully, search the knowledge base to resolve the copy problem before proceeding.
Step 2: Connect the Phaser 3635MFP to the network:
Power off the machine by pressing the power switch to the [O] (off) position.

Connect the Ethernet cable from the network to the RJ45 connector located on the back of the machine.

NOTE: The Ethernet cable is not supplied with the machine.Power on the machine by pressing the power switch to the [|] (on) position. When the machine is powered on, it will automatically obtain an IP address if an active DHCP server is on the Network. Alternatively, a static IP address can be manually assigned.
See the Related Content for additional information regarding configuring TCP/IP using DHCP or a static IP address.
NOTE: To use a static IP address, DHCP must be disabled, and then the IP address, gateway address, subnet mask, and DNS Server address must be manually entered.