Fault Code 099-395: Fuser Motor Current Failure
- Product support for
- VersaLink C8000 Color Printer, VersaLink C8000W Color Printer, VersaLink C9000 Color Printer
- Article ID
- KB0137074
- Published
- 2020-10-06
Try the following:
Power the printer off and on using the power button on the Control Panel.
Reseat the fuser.
To Reseat the Fuser:
WARNING: The Fuser and surrounding area may become hot during operation. To avoid injury, be careful while working in this area. It is recommended to wait for the Fuser to cool down for approximately 40 minutes after the printer has been powered off before reseating or replacing the Fuser.
Completely power the printer off and unplug the power cord.
Press the Power/Wake button on the Control Panel.
Touch Power Off.

Wait until the touch screen goes dark and the Power/Wake button stops flashing. Approximately 45 seconds.
Open the Front Door.
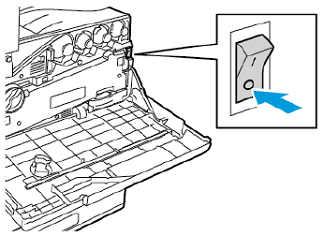
Press the Power switch to the Off position.

Close the Front Door.
Unplug the power cord.
Wait approximately 40 minutes for the Fuser to cool down.
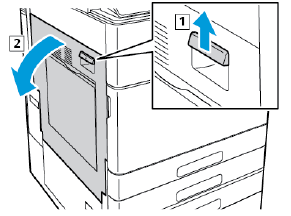
Open Door A on the left side of the printer.

Locate the first release latch on the left side of the Fuser.
Lift up on the latch and then slide it to the left.


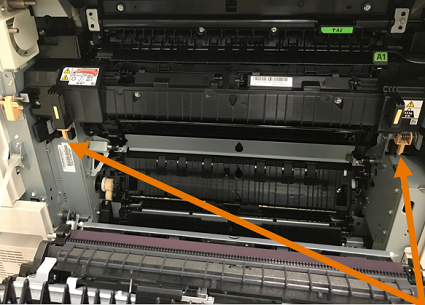
Locate the other two release latches just below the Fuser on the left and right side.
Lift up on both release latches, and then push in on the latches to release the Fuser. The Fuser should move forward slightly.

Grasp the handles on the left and right side of the Fuser, and then carefully pull the Fuser straight out of the printer.
CAUTION: If the Fuser cannot be pulled out easily, do not force it out. Review steps 5-7 to make sure the Fuser has been completely released from the printer.
Insert the Fuser back into the printer and make sure it clicks into place.

Slide the release latch to the right, and then press down on the latch to secure the Fuser into place


Close Door A.
NOTE: If the door does not close completely, make sure the latch is positioned properly.Plug in the power cord.
Power the printer back On.
Press the Power switch behind the Front Door to the On position.
Press the Power/Wake button on the Control Panel.
If the problem persists, contact Support for additional assistance.