Print Cover Pages
- Product support for
- VersaLink C8000 Color Printer, VersaLink C8000W Color Printer, VersaLink C9000 Color Printer
- Article ID
- KB0136336
- Published
- 2020-10-06
This article contains information on how to print cover pages from a Microsoft Windows OS and from an Apple Macintosh.
For Microsoft Windows
A cover page is the first or last page of a document. You can select paper sources for the cover pages that are different from the source used for the body of a document. For example, you can use your company letterhead for the first page of a document. You can also use heavyweight paper for the first and last pages of a report. You can use any applicable paper tray as the source for printing cover pages.
To Print Cover Pages
Open the file to be printed.
Select File > Print.
Select the required printer, and then click on Printing Properties or Preferences.
Click on the Document Options tab.
Click on the Special Pages tab.
Click on the Add Covers icon.
Select one of these options for printing cover pages:
No Covers - does not print cover pages. No cover pages are added to the document.
Front Only - prints the first page on paper from the specified tray.
Back Only - prints the back page on paper from the specified tray.
Front and Back: Same - prints the front and back cover pages from the same tray.
Front and Back: Different - prints the front and back cover pages from different trays.

After making a selection for printing the cover pages, you can select the paper for the front and back covers by size, color, or type. You can also use blank or pre-printed paper, and you can print side one, side two, or both sides of the cover pages.
Click on OK.
Click on OK or Print to send the job to the printer.
For Apple Macintosh
A cover page is the first or last page of a document. You can select paper sources for the cover pages that are different from the source used for the body of a document. For example, you can use your company letterhead for the first page of a document. You can also use heavyweight paper for the first and last pages of a report. You can use any applicable paper tray as the source for printing cover pages.
Open the file to be printed.
Select Print from the File menu.
Select the required printer.
Select Xerox Features from the application pull-down menu.
NOTE: If the menu is not available, click on the Show Details button at the bottom left of the window.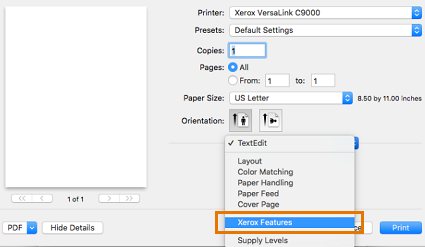
Select Special Pages from the next pull-down menu.
Click on the Add Covers button.
Select one of these options for printing cover pages:
No Covers - does not print cover pages. No cover pages are added to the document.
Front Only - prints the first page on paper from the specified tray.
Back Only - prints the back page on paper from the specified tray.
Front and Back: Same - prints the front and back cover pages from the same tray.
Front and Back: Different - prints the front and back cover pages from different trays.
After making a selection for printing the cover pages, you can select the paper for the front and back covers by size, color, or type. You can also use blank or pre-printed paper, and you can print side one, side two, or both sides of the cover pages.
Click on OK.
Click on OK or Print to send the job to the printer.