Print Booklets
- Product support for
- VersaLink C8000 Color Printer, VersaLink C8000W Color Printer, VersaLink C9000 Color Printer
- Article ID
- KB0136265
- Published
- 2020-10-06
This article contains information on how to print a booklet from a Microsoft Windows OS and from an Apple Macintosh.
To Print Booklets From a Windows OS
With 2-sided printing, you can print a document in the form of a small booklet. You can create booklets from any paper size that is supported for 2-sided printing. The print driver automatically reduces each page image and prints four page images per sheet of paper, two page images on each side. The pages are printed in the correct order so that you can fold and staple the pages to create the booklet.
Note: Not all options listed are supported on all printers. Some options apply only to a specific printer model, configuration, operating system, or driver type.
To Print a Booklet:
Open the file to be printed.
Select File > Print.
Select the required printer, and then click on Printing Properties or Preferences.
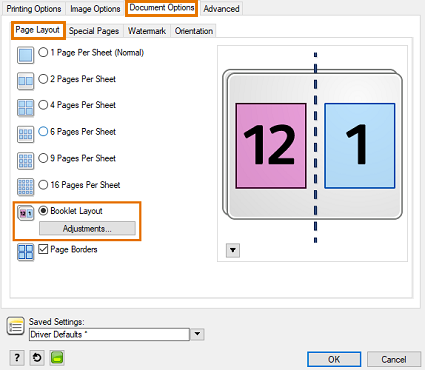
Click on the Document Options tab.
Click on the Page Layout tab.
Click on the Booklet Layout radio button.
Click on the Adjustments button.
Adjust the following settings, if needed:
Paper Size
Margins
Gutter
Creep
Reading Order
Click on OK.
Select any other required printing options.
Click on OK or Print to send the job to the printer.
To Print Booklets From a Mac
Note: The printer must be equipped with the Office Finisher or Business Ready Finisher with Booklet Maker (and enabled in the print driver) in order to create a folded and stapled booklet. Booklets can be created without a Finisher installed; however, the booklets will not be folded and stapled. The job will only be printed in booklet layout.
METHOD 1: To Print a Booklet With Booklet Layout in the Print Driver (Fold, Staple, and Layout)
Note: These steps were performed on a Mac with OS 10.13 using Adobe Acrobat Reader DC. Steps will vary if using other versions of Acrobat or other applications. Also, booklet printing may not be compatible with some versions of Acrobat such as Acrobat Pro 9 or Acrobat Reader 9.
Open the PDF to be printed.
Select Print from the File menu.
Select the Xerox printer from the Printer menu.
Click on the Page Setup button at the bottom left of the window, select the correct Paper Size, and then click on OK.
Click on the Printer button at the bottom left of the window.
Select Xerox Features from the Layout pull-down menu.
Select Booklet Creation from the Finishing pull-down menu.
Select one of the following from the Booklet Finishing pull-down menu:
Booklet Fold
Booklet Fold and Staple
If needed, remove the check mark from the Disable Booklet Layout option. To remove the check mark, click again on the Booklet Finishing menu and select Disable Booklet Layout.
Note: If your PDF document is not formatted as a booklet, make sure to remove the check mark from the Disable Booklet Layout option. This allows the printer to apply the booklet format (layout) options to the print job.Select the Paper Size to be printed under the Scale to New Paper Size pull-down menu.
Select whether or not to have a margin under the Booklet Margins pull-down menu.
If necessary, specify a Gutter and Creep.
Click on OK to close the Booklet Creation window.
Click on Print to send the job to printer.
METHOD 2: To Print a Booklet When the Document is Already in Booklet Format or When Using the Booklet Features Found in Adobe Acrobat. (The driver/printer will Fold and Staple only.)
Open the document to be printed.
Select Print from the File menu.
Depending on the application, the paper size may need to be selected from Page Setup. For example, select Letter, Legal, or Tabloid.
Select the required printer from the pull-down menu, and then click on Printer. The Print window will be displayed.
Select Xerox Features from the Layout pull-down menu.
Select Booklet Creation from the Finishing pull-down menu.
Select one of the following options from the Booklet Finishing pull-down menu.
Booklet Fold
Booklet Fold and Staple
If needed, add a check mark next to the Disable Booklet Layout option. To add a check mark, click again on the Booklet Finishing menu and select Disable Booklet Layout.
Note: If your document is already formatted as a booklet, make sure to add a check mark next to the Disable Booklet Layout option. This ensures that the printer will not apply booklet format (layout) options to the print job.Click on OK to close the Booklet window.
Select one of the following options from the 2-Sided Printing pull-down menu.
2-Sided Print
2-Sided Print, Flip on Short Edge
Note: It may be necessary to run a test job to determine which 2-Sided option should be selected.
Click on Print to send the job to printer.