Remove the Black Imaging Unit, Check for Damage, Re-Install or Replace the Imaging Unit
- Product support for
- Phaser 7800
- Article ID
- KB0091247
- Published
- 2016-11-10
CAUTION: The protective shield is required to perform this procedure correctly without damaging the Imaging Units. The protective shield is included with each new Imaging Unit. After installation of a new unit, one shield should be set aside (extra shields can be discarded) and labeled for use when removing and re-installing an Imaging Unit.
If you can not locate the protective shield, you should not perform this procedure.
Open the Front Cover.
Locate the lock lever for the imaging unit cover, and then rotate the lever to the left to unlock the cover.
Open the imaging unit cover.
Perform the following steps for the Black Imaging Unit:
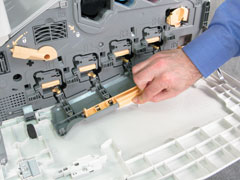
Grasp the end of the Black Imaging Unit, and then pull the unit straight out of the printer.

Check the unit for damage.
If the unit is damaged:
Set the unit aside and use a new Imaging Unit.
CAUTION: Replacing the Imaging Unit is a procedure that is performed periodically, due to usage. It is recommended to save the protective shield during one of these periodic replacements. Subsequent replacements do not require this precaution. The shield will be needed if the Printer encounters a problem in which you are directed to remove and re-install an Imaging Unit as part of the fix. Label the shield and keep it in a safe place.Remove the new Imaging Unit from its packaging. Recycle the packaging.
CAUTION: Do not remove the plastic protective shield. The shield encapsulates the Imaging Unit to protect the unit from being touched during the installation process.Proceed with the steps below.
If the unit is not damaged:
Attach the plastic protective shield to the Imaging Unit, being careful not to touch the unit in any areas that will cause damage.
Proceed with the steps below.
Grasp the Imaging Unit, making sure to support the bottom of the unit, and align the plastic protective shield with the holes inside the Printer.

While supporting the bottom of the unit with one hand, use your other hand to push the light orange tab to slide the Imaging Unit into the Printer.

When done checking the Black Imaging Unit:
Close the imaging unit cover.

Rotate the lever completely to the right to lock the cover in place. If the lever is not completely in the locked position the Front Cover will not close.

Close the Front Cover.
Label the protective shield and place it in a safe location for use at a later time. The shield will be needed any time you are directed to perform a remove and re-install of the Imaging Unit as part of a troubleshooting procedure for a Printer problem.