Replace the Duplex Automatic Document Feeder (DADF) Feed Rollers
- Product support for
- Xerox AltaLink C8200 Series Color Multifunction Printers, Xerox AltaLink B8200 Series Multifunction Printers
- Article ID
- KB0424030
- Published
- 2024-10-31
Instructions
Note: The High Speed Versions of these devices (8270) have 250-Sheet Document Feeder where the rollers are not customer replaceable, If these devices experience document feeder jams Clean the Rollers then contact Support for further assistance.
Remove the Old Rollers and Install the New Rollers:
CAUTION: To avoid possible injury, do not touch any sharp edges inside the device.
At the printer control panel, press the Power/Wake button.
Touch Power Off.
Unplug the printer.
NOTE: If the printer does not respond to a single press of the Power/Wake button, then press and hold the button for 5 seconds. A please wait message is displayed while the printer powers down. After 10 seconds, the touch screen goes dark and the Power/Wake button flashes until the printer has completed powering down.Open the front door.
Switch the main power switch to the Off position.
Open the Duplex Automatic Document Feeder (DADF) Top Cover. The feed rollers are located under the cover.
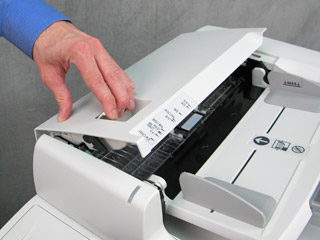

Locate the Feed Roller Cover release clip above the rollers. Press the clip up and release the cover.


At the Feed rollers, pull the grey lever up and unclip it from the machine.


Slide both Feed Rollers to the left to remove them.

Install the new Feed Rollers inserting the metal side first.


Install the new grey lever and clip it back into position.

Close the Feed Roller Cover.

Remove the Old Retard Rollers and Install the New Retard Rollers:
Note: Before start unplug the printer.
CAUTION: To avoid possible injury, do not touch any sharp edges inside the device.
Lift up the black retard roller holder to partly unclip it from the machine.

Remove the Retard Roller from the machine and install the new Retard Roller.


Push down on the black retard roller holder and clip it back into position.
Lower the cover until it clicks into place to close the DADF top cover.
Plug back the printer.
Power on the machine.