Scan to Box
- Product support for
- Xerox Instant Print Kiosk
- Article ID
- KB0397984
- Published
- 2019-02-15
Load your original documents:
Use the document glass for single pages or paper that you cannot feed using the document feeder. Place the first page of the document facing down, in the top, left corner of the document glass.

Use the document feeder for multiple or single pages. Remove any staples and paper clips from the pages. Place the pages facing up in the document feeder. The confirmation indicator illuminates when you load the originals correctly. Adjust the Document Feeder guides to touch the edges of the original document.

Follow the guidelines below when placing your original documents on the Document Glass or in the Document Feeder.
8.5" x 11": Place the document(s) in portrait orientation (LEF) on the glass or the Document Feeder.
8.5" x 14": Place the document(s)in landscape orientation (SEF) on the glass or in the Document Feeder.
11" x 17": Place the document(s) in landscape orientation (SEF) on the glass or in the Document Feeder.
From the Welcome screen, touch Scan. The Scan screen displays.

Touch Box. The Box Sign In screen displays.

Enter your Email Address and Password.
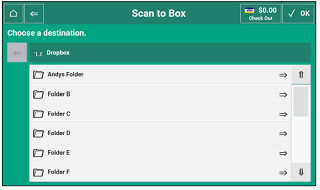
Touch Log In. A screen displays showing the folders in your Box.

Select a destination for your scan.
Touch OK. The Scan to Box screen shows the options available to you for the scan.
NOTE: You can use the default settings or select different settings. To select your setting, continue with the next step.Decide on a name for your file.
Touch File Name.
Enter a name for your scan.
Touch OK.
If no other options are required, skip to step 8.

Decide on the file format.
Touch File Format.
Touch:
PDF to create a PDF file
PDF/A to create an ISO-standardized version of a PDF file.
JPG to create a JPG file
If no other options are required, skip to step 8.

Select your Output Color preferences.
Touch Output Color.
Touch:
Match Originals to match the color to the originals (Default)
Color to make colored copies
Grayscale to make grayscale copies
Black & White to make black-and-white copies
If no other options are required, skip to step 8.

Decide between 1- and 2-sided scanning.
Touch 2-Sided.
Touch:
1-Sided Scanning to scan one-sided copies (Default)
2-Sided Scanning to scan two-sided copies
Rotate Side 2 to scan two-sided copies with the second side rotated
If no other options are required, skip to step 8.

Select the size of your original document.
Touch Original Size.
Touch:
Auto Detect to let the system automatically detect the size of the document.
Another selection that matches the size of the document you are scanning.
If no other options are required, skip to step 8.

Select the orientation of your original document.
Touch Original Orientation.
Choose:
Portrait if your orientation is portrait
Landscape if your orientation is landscape
Upright Originals
Sideways Originals
If no other options are required, skip to step 8.

Select the Original Type that best represents your original document.
Touch:
Text
Photo
Text & Photo
If no other options are required, skip to step 8.

Select the Resolution you require.
Touch:
72 dpi / 100 dpi / 150 dpi / 200 dpi / 300 dpi / 400 dpi / 600 dpi
If no other options are required, skip to step 8.

Touch Scan. A screen displays indicating that your job is calculating the job cost.


The Job Cost screen displays.
Touch Continue. The Processing Your Scan Job screen displays.

The Your Scan Job Is Complete screen displays.
To scan another job, touch Do More. The first Scan to Box screen displays. Repeat steps 1 through 18.

To end your session and print your receipt, touch Check Out. A screen displays indicating that the receipt is being printed and your payment information has been removed.
