Replace a Toner Cartridge
- Product support for
- PrimeLink C9065/C9070 Printer
- Article ID
- KB0383274
- Published
- 2019-10-01
If needed, order a replacement Toner Cartridge. For details, refer to Order Supplies, Consumables, and Parts.
You can install and replace toner cartridges while the printer is running. A waste toner container is supplied with a toner cartridge.
Use genuine Xerox Toner Cartridges in Cyan, Magenta, Yellow, and Black.
Note: Each toner cartridge includes installation instructions.
CAUTION: Use of toner other than Genuine Xerox Toner can affect print quality and printer reliability. It is the only toner designed and manufactured under strict quality controls by Xerox for specific use with this printer.
The printer control panel displays a warning when a supply nears replacement time. Verify that you have replacements on hand. It is important to order supplies when the messages first appear to avoid interruptions in printing. The touch screen displays an error message when the supply must be replaced.
Replacing the Toner Cartridges
This procedure shows you how to remove a used toner cartridge and replace it with a new toner cartridge. When it is time to install a new toner cartridge, a message appears on the control panel. You can print approximately 1200 pages for cyan, magenta, and yellow cartridges, and 1800 pages for the black cartridge. If the control panel message about toner replacement appears, but you continue copying or printing, the printer stops.
When you receive the new cartridge, follow the disposal instructions for the used cartridge.
Warning: Before you begin the procedure, ensure that the printer is cool. Failure to do so can result in burns if certain parts of the printer are touched.
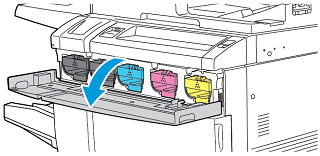
While the printer is powered on, replace the toner cartridge. Open the toner cover, located just above the front cover.
Before removing the cartridge, to protect the work area, lay paper on the floor. For the color toner indicated on the control panel, grasp the toner cartridge handle on the end of the cartridge. Pull the cartridge partially out of the printer until the handle on top is available. To remove the toner cartridge fully, hold it by the front and top handles while gently sliding out the cartridge. Ensure that you keep the cartridge level while you slide it out of the printer.

Dispose of the toner cartridge as normal office waste, or recycle the cartridge.
Note: Be careful not to get toner on clothing.
Remove the new toner cartridge from the packaging.
To redistribute the toner, gently tilt the new cartridge up and down, then left and right.
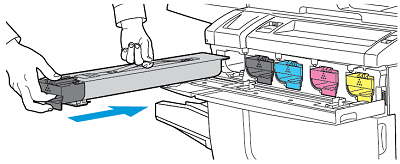
To install the new toner cartridge, align the arrows on the cartridge with the printer. Push in the cartridge until it clicks.
Close the toner cover. If the door does not close completely, ensure that the cartridge is in the lock position, and the toner cartridge is installed into the appropriate toner location.
Warning: Never use a vacuum cleaner when you clean spilled toner. An explosion can occur when toner fills a vacuum cleaner and contacts sparks. To remove spilled toner, use a broom or a cloth moistened with a neutral detergent.