Install a Print Driver (Add a Printer) on a Computer With Microsoft Windows 2000 / XP / Server 2003 OS to Print Using a Standard TCP/IP Port to the EFI Splash RPX-ii Color Server
- Product support for
- Xerox Color C75 Press, Xerox Color J75 Press
- Article ID
- KB0328693
- Published
- 2015-07-22
NOTE: The computer that is using the Windows OS must have an IP address in order to set up printing using this protocol. If the computer does not have an IP address, a System or Network Administrator will need to provide one. An Administrator may also be required to perform this solution as some users may not have rights to add local printers or local ports.
Before beginning, print a System Settings (Configuration) Report and make sure the Splash RPX-ii Color Server has an IP address. See the Related Content for additional information.
This solution assumes that the correct print driver for the product and the operating system has been downloaded and extracted to a known location on the computer. If you have not already done so, download the print driver from [Drivers and Downloads] and extract the latest print driver files for this product and operating system to a known location on the hard drive.
To create a Standard TCP/IP Port:
Open the Printers or Printers and Faxes window. See the Related Content for additional information.
Double-click on [Add Printer] or [Add a printer]. The Add Printer Wizard window will be displayed.

With [Local Printer attached to this computer] selected, click on [Next].
Click on the [Local Printer] or [Local Printer Attached to This Computer] radio button. If necessary, click on the box next to [Automatically detect and install my Plug and Play printer] to remove the check mark, and then click on [Next].

Click on the [Create a new port] radio button.
Select [Standard TCP/IP Port] from the Type of port menu.
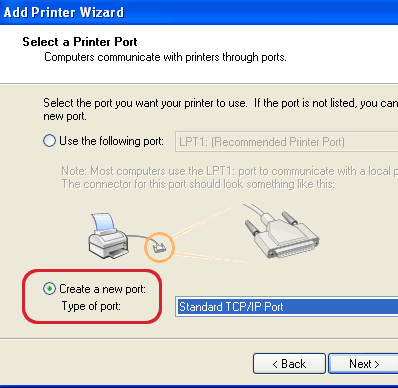
Click on [Next]. The Add Standard TCP/IP Printer Port Wizard will be displayed.
Click on [Next].
Enter the IP address of Splash RPX-ii in the Printer Name or IP Address field.

A default port name will be displayed in the Port Name field. For example, IP_xxx.xxx.xxx.xxx. If necessary, this port name can be edited.
Click on [Next]. The Additional Port Information Required window will be displayed.
Click on the [Custom] radio button.
Click on [Settings]. The Configure Standard TCP/IP Port Monitor window will be displayed.

Under Protocol, click on the [Lpr] radio button.
Under Lpr Settings, enter a queue name in the Queue Name field.
NOTE: The LPR queue name can be up to 8 characters in length.If necessary, click on the check box next to [LPR Byte Counting Enabled] to remove the check mark.

Click on [OK]. The Add Standard TCP/IP Printer Port window will be displayed.
Click on [Next].
Click on [Finish]. The Add Printer Window will be displayed.
To add the printer:
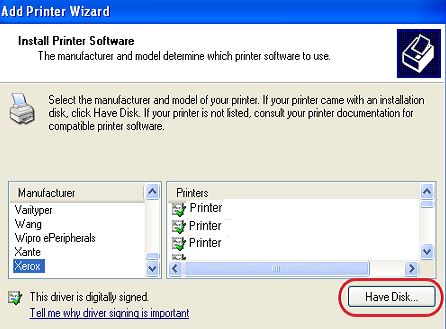
NOTE: Make sure to select the correct printer model and driver type from the list. Some drivers will end with 'SA'. These are Secure Access drivers and should only be selected purposefully.
Click on [Have Disk]. The Install From Disk window will be displayed.
Click on [Browse]. The Locate File window will be displayed.
Browse to the location of the print driver.
Click once to highlight the [.inf] file, and then select [Open].

Click on [OK] on the Install From Disk window.
Select the printer model from the list, and then click on [Next]. The Printer Name will be displayed and can be edited.
NOTE: If the print driver was previously installed, a 'Use Existing Driver' window will be displayed. Click on the [Replace existing driver] radio button and then click [Next].
If necessary, enter a new name for the printer in the Printer Name field.
Click the [Yes] or [No] radio button to use this printer as the Default Windows Printer, and then click on [Next]. The Printer Sharing option will be displayed.

Click on the [Not Shared] radio button, then click on [Next]. The Print Test Page window will be displayed.

Click on [Yes] or [No] to print a test page. The Completing the Add Printer Wizard window will be displayed.

Click on [Finish].

NOTE: A 'Digital Signature Window Not Found' window may be displayed. If it is displayed, select [Yes].A 'Copying Files' window will be displayed, and then the Printers or Printers and Faxes window will be displayed.
Make sure to configure the printer's installable options.
Close the Printers or Printers and Faxes window.