Replace the Drum Cartridge (Xerographic Module)*
- Product support for
- Xerox D136 Copier/Printer and D136 Printer, Xerox D95/D110/D125 Copier/Printer, Xerox ED95A/ED125 Copier/Printer, Xerox 4110 Copier, Xerox 4110 Enterprise Printing System, Xerox 4110 Copier/Printer, Xerox 4112/4127 Enterprise Printing System, Xerox 4112/4127 Copier/Printer, Xerox 4590 Enterprise Printing System, Xerox 4595 Copier/Printer
- Article ID
- KB0324732
- Published
- 2020-02-28
NOTE: A video is available at the end of this solution.
NOTE: This solution is intended for a trained operator. It is recommended to contact your Machine Administrator or Service Representative for additional assistance if unfamiliar with performing the steps below to replace the Drum Cartridge.
WARNING: Make sure the machine has stopped copying / printing and that the "Online" and "Job in Memory" LEDs on the User Interface are off before continuing with the steps below.
To remove the old Drum Cartridge:
CAUTION: Do not remove the new Drum Cartridge from its packaging until instructed to do so. Exposure to direct sunlight or strong indoor fluorescent lighting for more than two minutes may cause damage to the photoreceptor.
Power the machine off using the power switch on the Control Panel.
Prepare a clean, flat surfaced area with paper or cardboard. This is where the used Drum Cartridge will be placed.
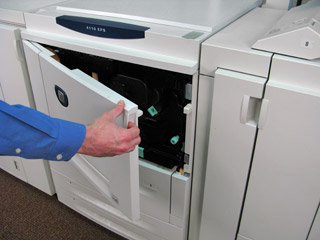
Open the Front Door.
NOTE: If the shipping Drum Latch Cover has not been removed, remove the screw from the Drum Latch Cover using a 5.5 mm nut-driver or #2 Phillips screwdriver. Discard the screw and Drum Latch Cover, as this is not needed.
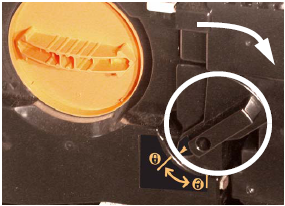
Move handle 2 to the unlocked position.

Move the Drum Lock lever to the unlocked position.

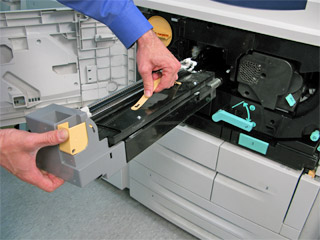
Grasp the Drum Cartridge, press in the Drum Latch, and then carefully pull the cartridge straight out until the handle on top of the cartridge is visible.

Grasp the handle on top of the cartridge, and then completely remove the cartridge from the printer.
Set the Drum Cartridge aside on the paper or cardboard prepared in step 4.
IMPORTANT: Place any suspected defective cartridge that is removed from the printer in protective wrapping/packaging material for situations where it may still be a functioning cartridge. If you do not have the original packaging material, use the packaging from the new cartridge.
Install the Replacement Drum Cartridge:
CAUTION: Do not remove the new Drum Cartridge from its packaging until instructed to do so. Exposure to direct sunlight or strong indoor fluorescent lighting for more than two minutes may cause damage to the photoreceptor.Remove the new Drum Cartridge from its box.
Remove the foam from both ends of the wrapper.
When ready to install the Drum Cartridge, remove it from the wrapper.
Carefully remove the tape and paper from the Drum Cartridge.
CAUTION: Do not allow the blue drum to contact any surface or be exposed to light for more than two minutes.Holding the cartridge by the handle, carefully align the cartridge with both rails in the printer.


Make sure the cartridge is aligned with the rails, and then gently (but firmly) push the cartridge straight in until it clicks into position.

Move the Drum Lock lever to the locked position.
Move handle 2 to the locked position.

Close the Front Door.
Power the machine on using the power switch on the Control Panel.
NOTE: It is not necessary to reset a counter.Make sure the machine is operating correctly by making a few copies.
VIDEO: