Fault Code 305-905: Duplex Automatic Document Feeder (DADF) Feed Out Sensor Static Jam
- Product support for
- WorkCentre 7830/7835/7845/7855, WorkCentre 7830i/7835i/7845i/7855i
- Article ID
- KB0243585
- Published
- 2021-03-31
Fault Code 305-905: DADF Feed Out Sensor Static Jam can occur when a jam occurs inside the Duplex Automatic Document Feeder (DADF) while feeding paper through during a scan or copy.
Note: This solution assumes that you are using originals in good condition, are not torn or have any staples, and is positioned correctly in the Document Feeder.
Smooth out any staple holes, bent corners, folds, curls or any other defects
Do not use originals that have perforated or frayed edges
If necessary, create a new original from the Document Glass
Step 1: Clear the Jam in the Duplex Automatic Document Feeder (DADF)
Step 2: Make Sure the Duplex Automatic Document Feeder (DADF) Cover is Closed
Step 4: Power Off the Printer and Reseat the Document Feeder Connector
Step 5: Clean the Feed Rollers in the Document Feeder
Step 1: Clear the Jam in the Duplex Automatic Document Feeder (DADF)
NOTE: To avoid damaging the printer, always remove misfed media carefully, without tearing it. Try to remove the paper in the direction that the paper would normally feed.
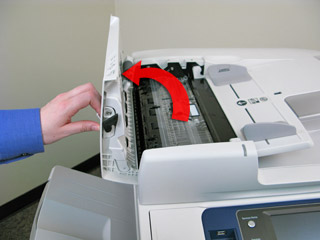
Lift the lever and open the Top Cover of the Document Feeder.
Pull the original straight out if the original is not caught in the entry to the Document Feeder.
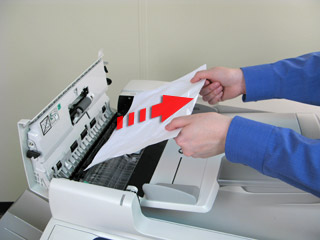
Review the message on the Touch Screen and follow the instructions provided. If indicated, rotate the green wheel in the direction indicated in the message to remove the original from the handler.

Lift up on the green tab if indicated to open the Inner Cover and rotate the wheel in the direction shown to remove the jammed original.


Close the Inner Cover, and then close the Top Cover. Make sure to press down gently on the cover until it clicks into position.
Lift up the Feeder Tray and remove any paper in this area, and then lower the tray back into position.

Lift the Document Cover to remove any originals in this area, then lower the cover back into position.

NOTE: After clearing a jam in the Document Feeder, reload all originals, including the pages already scanned. The printer will automatically skip the scanned pages and scan the remaining pages.
CAUTION: Torn, wrinkled or folded originals my cause jams and damage the printer. Place the originals face-down, one at a time, on the Document Glass to make a copy.
Step 2: Make Sure the Document Feeder Cover is Closed
When scanning or copying using the Document Feeder, the cover on the eeder must remain closed. To confirm the cover is closed, lift up on the handle on top of the feeder to open the cover, then close the cover so that the cover clicks in place.
Step 3: Feed a Piece of Cardstock or Folded Sheet of Paper Through the Document Feeder to Clear the Jam
Fold a Letter size (216 x 279 mm / 8.5 x 11 in.) or a Statement size (140 x 216 mm / 5.5 x 8.5 in.) sheet of paper in half along the long edge. A sheet of cardstock or heavyweight paper can also be used, but folding is not necessary if thicker paper is used.

Insert the folded edge of the paper into the Document Feeder under the rollers near the green dial.

Turn the green dial to wind the folded paper through the Document Feeder to remove debris (such as paper clips, adhesive-backed notes, or staples) from inside.
Step 4: Power Off the Printer and Reseat the Document Feeder Connector
Power off the printer.
Press the power switch below the Control Panel to the Off (O) position. A warning message will be displayed on the Touch Screen that the printer is powering off.
NOTE: When the optional Office Finisher LX is installed, the secondary power switch is behing a clear plastic door.Open the Front Cover, press the power switch to the Off (O) position, and then close the cover.
Locate the connector at the rear of the printer.
Unscrew the 2 hand screws counter clockwise.
Disconnect the DADF connector completely from the printer, then reconnect the DADF connector to the printer.
Tighten the screws securely.
Power on the printer.
Open the Front Cover, press the power switch to the On position, and then close the cover.
Press the power switch below the Control Panel to the On position.
Step 5: Clean the Document Feeder Feed Rollers
Dirt on the document feed rollers can cause paper jams or deteriorate print quality. For best performance, clean the feed rollers once a month.
Lift the lever and open the Document Feeder Top Cover.

While turning the rollers, wipe them with a clean, lint-free cloth moistened with water.

When finished, close the cover.