Configure and Connect the WorkCentre 6515 to a Wireless Network From the Embedded Web Server
- Product support for
- WorkCentre 6515
- Article ID
- KB0230189
- Published
- 2019-10-09
Note: Before you begin, purchase the Xerox Wireless Network Interface.
The optional wireless network adapter plugs in to the back of the control board. After the adapter is installed, and wireless networking is enabled and configured, the adapter is able to connect to a wireless network.
Step 1: Install the Wireless Network Adapter
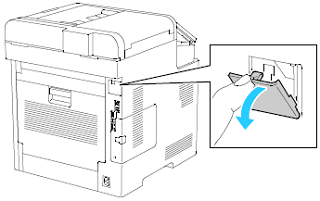
Turn off the printer.

To remove the Wireless Network Adapter Port Cover, press down the latch and pull it away from the printer.
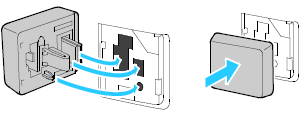
Remove the packaging from the Wireless Network Adapter.
To install the Wireless Network Adapter, follow the procedure defined on the instruction sheet provided with the Wireless Network Adapter.
CAUTION: Pulling on the adapter can cause damage. After the adapter is installed, remove it only as needed, and as directed in the Wireless Network Adapter removal instructions. For details, refer to Remove the Optional Wireless Network Adapter.Turn on the printer.
To verify the wireless status and see the wireless IP address, print a Configuration Report and examine the Connectivity Physical Connections, Connectivity Protocols, and TCP/IPv4 sections of the report.
Press the Home button.
Touch Device > About > Information Pages.
Select Configuration Report. The Configuration Report will print.
Note: The printer uses separate IP settings for wired and wireless network connections.
Note:When you switch from a wired connection to a wireless connection, the IP address of the printer changes. The connection to the Embedded Web Server through your Web browser closes. To reconnect to the Embedded Web Server, enter the new IP address or host name of your printer in the address field of your web browser.
Step 2: Configure Wi-Fi in the Embedded Web Server
To enable Wi-Fi:
Connect the printer to a wired network.
Click Connectivity.
In the Connections area, click Wi-Fi.
Note: Wi-Fi is available after you install the Xerox Wireless Network Interface.To enable Wi-Fi, click the Enable toggle button.
Click Wi-Fi Band, then select an option.
For SSID, type the SSID for the network to which you want to connect.
Click Network Type, then select Infrastructure or Ad hoc, as needed.
Note: The Infrastructure network type provides the greatest selection of security options. Ad hoc provides only WEP encryption in most networks.
To configure the TCP/IP common settings:
In the TCP/IP Settings area, click Common.
For Host Name, type the DNS host name of the printer.
Click Primary Network, then select Wi-Fi.
Click OK.
If prompted, click Restart Later.
To configure the TCP/IP IP settings:
Click IPv4:
For Mode, select an option.
If you select Static for Mode, for IP Address, Subnet Mask, and Gateway Address, type the IP addresses.
If you select DHCP with Auto IP or DCHP for Mode, the Release current IP when the Device is powered off option is available. To use this feature, select the toggle button.
Click OK and Restart Later, if prompted.
To configure the TCP/IP DNS settings:
Click DNS.
For Domain Name, type the name of the domain for the printer.
For Connection Timeout, type the number of seconds that the printer waits to receive a response from the DNS server.
To enable DHCP to assign the IP address, in the IPv4 DNS Servers area, for Use DHCP to Assign Address, select the toggle button.
Click OK.
To configure the security settings for non-Enterprise environment:
In the Security Settings area, click Encryption, then select the appropriate security option. For the mode of encryption that you selected, configure the security settings.
For WEP:
To set a transmit key to active, click Transmit Key, then select an option.
For each Transmit Key, type values into the corresponding fields.
For WPA2 Personal and Mixed Mode Personal, in the Passcode and Retype Passcode fields, type the network passcode.
Click OK.
To activate your changes, at the prompt, click Restart Now.
Step 3: Complete the Wi-Fi setup
Disconnect the Ethernet cable from the printer.
After the printer restarts, wait 2 minutes and then print a Configuration Report to obtain the IPV4 address.
Press the Home button.
Touch Device > About > Information Pages.
Touch Configuration Report. The Configuration Report will print.
Locate the IPv4 address under the Connectivity section on the report. You are now ready to install the print driver.
Note: The Configuration Report contains the IP address for the printer. If the printer does not successfully connect with the wireless network, check your network information and repeat this procedure.