WorkCentre 7120: Replace a Drum Cartridge
- Product support for
- WorkCentre 7120/7125
- Article ID
- KB0220950
- Published
- 2020-06-10
CAUTION: Do not expose the Drum Cartridge to the direct sunlight or strong indoor fluorescent lighting. Do not touch or scratch the surface of the Drum.
Do not use warm water or cleaning solvents to remove Toner (Dry Ink) from your skin or clothing. This will set the Toner and make it difficult to remove. If any Toner gets on your skin or clothing, use a brush to remove the Toner or wash it off with cold water and mild soap.
NOTE:
R1 = Black (K) Drum Cartridge
R2 = Cyan (C) Drum Cartridge
R3 = Magenta (M) Drum Cartridge
R4 = Yellow (Y) Drum Cartridge
To Replace a Drum Cartridge:
Make sure the printer has stopped printing or copying.
CAUTION: Do not open the Front Cover if the machine is still operating. Doing so may cause paper jams.Place a few sheets of paper on the floor, under the Front Cover. The sheets of paper will prevent any Toner that may spill when removing the Waste Toner Container from damaging the floor.

Open the Front Cover.
Remove the Waste Toner Container.
CAUTION: Be very careful when removing the Waste Toner Container to prevent spilling toner. Do not shake or turn the container over.Push down on the orange tabs on the left and right side of the Waste Toner Container.
Gently rotate the container downward until it lies flat.
Keep the container flat, lift it with both hands, and then place it on the sheets of paper on the floor.

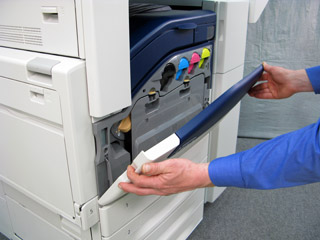
Rotate the release lever on the left side of the Drum Cartridge Cover to the unlocked position, and then open the cover.

Grasp the plastic lever on the cartridge to be replaced, pull down on the lever, and then partially pull the cartridge out of the machine.


While still holding the lever with one hand, grasp the left side of the cartridge with your other hand and then completely remove the cartridge from the machine.

Place the used Drum Cartridge in the bag that came with the new cartridge.
NOTE: To return the used Waste Toner Container for recycling, follow the instructions included with the new container. If the instructions or shipping label are not available, click on the [Recycling] link under Related Content for additional information.Remove the new Drum Cartridge from its box and packaging.
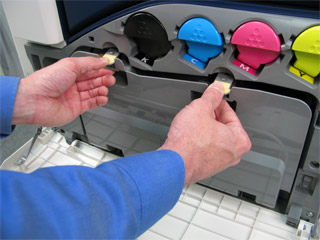
CAUTION: Do not remove the protective strip on top of the cartridge until the cartridge has been installed in the machine. Removing the strip will expose the Drum to light. If the Drum is left exposed for more than a few minutes it can lower the life of the Drum Cartridge or cause print quality degradation.Gently pull both sealing tapes out of the cartridge.

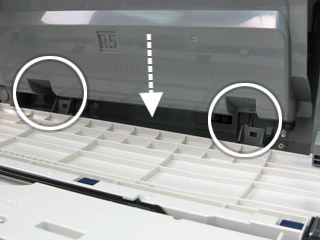
Push the cartridge into the machine until it clicks into place.

Grasp the tab at the end of the protective strip, and then pull the protective strip out of the machine.

Close the Drum Cartridge Cover until it clicks into position.

Rotate the release lever on the left side of the Drum Cartridge Cover to the locked position.

Carefully re-install the Waste Toner Container.

Close the Front Cover.
Video: