Clear the Paper Jam at Paper Tray 1
- Product support for
- WorkCentre 3315/3325
- Article ID
- KB0139185
- Published
- 2016-04-15
Press the release latch on the left side of the printer and open the Front Door.


Close the Front Door. The jammed paper is automatically ejected from the printer. If the paper does not exit, go to the next step.

Open Paper Tray 1 and remove the tray from the printer.
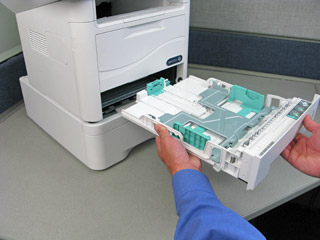
Remove any jammed paper by gently pulling the paper straight out.

Perform one of the following:
If the paper is removed, insert Paper Tray 1 into the printer, and close the tray. Printing automatically resumes. This completes the steps needed from this procedure.
If the paper does not move when pulled, or if no paper is seen in this area, continue with the next section.
Check the area around the Print Cartridge:
CAUTION: The Print Cartridge contains components that are sensitive to light, temperature, and humidity. Follow the recommendations provided to have the optimum performance, highest quality, and longest life from the new Print Cartridge.
Do not use warm water or cleaning solvents to remove Toner (Dry Ink) from your skin or clothing. This will set the Toner and make it difficult to remove. If any Toner gets on your skin or clothing, use a brush to remove the Toner, or wash it off with cold water and mild soap.
For additional product and material safety information, click on Related Content.
Press the release latch on the left side of the printer, and then open the Front Door.
Pull the Print Cartridge out, lifting the cartridge up slightly at the front.
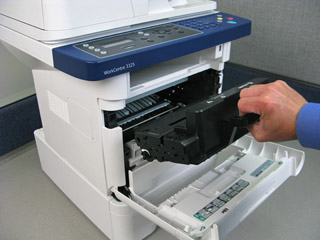
CAUTION: Do not touch the green underside of the print cartridge. Use the handle on the cartridge to avoid touching this area.Remove any jammed paper by gently pulling the paper straight out.

Hold the Print Cartridge by the handle and slowly insert the cartridge into the opening in the printer.
Tabs on the sides of the cartridge and corresponding grooves within the machine will guide the cartridge into the correct position until the cartridge locks into place.
Close the Front Door. Make sure the door is securely closed.
Insert Paper Tray 1 into the printer, and close the tray. Printing automatically resumes.