Install a Print Driver for a Microsoft Windows OS (Network or USB Connection)
- Product support for
- VersaLink C8000 Color Printer, VersaLink C8000W Color Printer, VersaLink C9000 Color Printer
- Article ID
- KB0136325
- Published
- 2020-10-06
Install a Print Driver for a Network Connection
Before installing driver software, verify that the printer is plugged in, powered on, connected correctly, and has a valid IP address. The IP address usually appears in the upper right corner of the control panel. If needed, see the Related Content for information on how to configure IP settings.
Note: The steps below apply to Microsoft Windows 10. Steps may vary depending on how your computer is configured and for other versions of Windows.
Note: Several driver types are available for this printer. The steps below provide instructions to install the recommended driver, which is the PostScript (PS) driver.
Install a Print Driver for a Wired (Ethernet) Network Connection
Download the PostScript Driver from the Xerox Drivers and Downloads page.
Note: Click on the Drivers and Downloads link in the Related Content section to access the Xerox Drivers and Downloads page for your product.After the PostScript Driver has been downloaded, extract the driver files to a known location.
Open the Windows Control Panel.
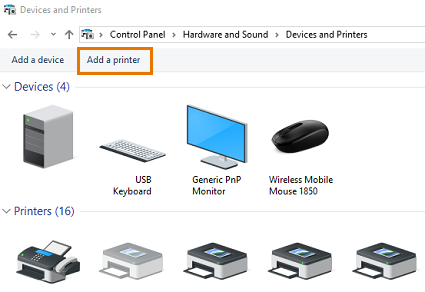
Click on View Devices and Printers.

Click on Add a Printer.
Click on The printer that I want isn't listed.

Select Add a local printer or network printer with manual settings.
Click Next.

To use a previously established port, select Use an existing port, then from the list, select a valid Standard TCP/IP Port. It should display the printer's IP address. If a port does not exist for the printer, create a new port.
To create a new Standard TCP/IP port:Select Create a New Port.
For Type of port, select Standard TCP/IP Port, then click Next.
In the Hostname or IP address field, type the printer's IP address.
Clear the check box for 'Query the printer and automatically select the driver to use', then click Next.

On the Install the Printer Driver screen, click Have Disk.

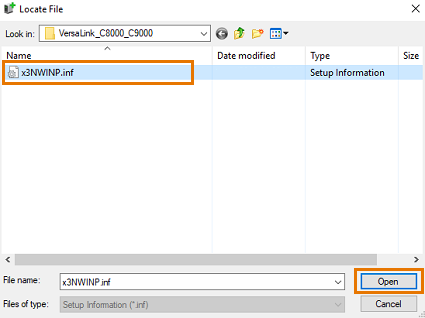
Browse to the location of the extracted driver files, select the .inf file and click Open, then click OK. Note that the name of the file may vary.
Select the correct printer model, then click Next.

Enter a name for the printer, then click Next to begin the installation.
If needed, set the printer as the default printer.
Select whether or not to Share the printer, then click Next. If unsure, click Do Not Share.
To send a test page to the printer, click Print a test page.
To complete the installation, click Finish.
Install a Print Driver for a USB Connection
NOTE: Some features are not available when connected via USB. To utilize all of the features for this printer, it is recommended to connect the printer to a network via an Ethernet connection or with the optional Wireless Network Adapter.
The instructions below are intended for users that:
Will be connecting the printer to a computer via USB for the first time.
Have not installed the print driver software yet.
IMPORTANT: Do not connect the USB cable until after the print driver software has been installed on the computer.
This article contains the following sections:
Supported Windows OS
Requirements
Install the Print Driver from the Software and Documentation Disc
Install the Print Driver Downloaded From Xerox.com/Support
Connect the Printer to a Computer Using USB
Supported Windows OS
Windows 7, Windows 8.1, Windows Server 2008, Windows 10, Windows Server 2008 R2, and Windows Server 2012.
Requirements
Confirm the following requirements and items before you begin:
The printer is turned on and in a ready state.
Obtain a USB 2.0 or 3.0 cable with an A and B connection that is less than 3 m (9 ft 10 in) in length.
There is an available USB port on your computer. If you connect through a USB hub or docking station, the printer might not receive enough power to properly operate.
Obtain the Software and Documentation disc that came with the printer. If you do not have the disc or do not have a disc drive on your computer, download the print driver from Xerox.com/Support or click on the Drivers and Downloads link in the Related Content section on this page to be directed to the drivers and downloads page for your printer. Download either of the following:
PostScript Print Driver - Xerox User Interface - Microsoft Certified (Recommended)
PCL6 Print Driver - Xerox User Interface - Microsoft Certified.
IMPORTANT: Do not connect the USB cable until after you install the print driver. After the print driver software is installed, then you can follow the steps in the Connect the Printer to a Computer Using USB section at the end of this entry.
Install the Driver
To Install the Driver from the Software and Documentation Disc:
Insert the Software and Documentation disc into the appropriate drive on your computer.
NOTE: If the installer does not start automatically, navigate to the drive, and double-click the Setup.exe installer file.Depending on your computer's security, you may have User Account Control enabled. If so, click Yes on "Do you want to allow this app to make changes to your PC?"
Click Install Print Driver From Disk.
At the License Agreement window, select I Agree.
On the Pick an installation method window, leave Add a new printer using an existing port selected and do not change which port is selected. The USB port that Windows creates will be selected later.
Click Next.
On the Pick a driver for the new printer window, select Install a new driver and then click Next.
On the Select the manufacturer and model of your printer window, click on the Have Disk… button. The Install From Disk window will be displayed.
Click on the Browse button, find the Xerox Software Disk, then browse to the location of the folder where the driver files are located.
Select either Windows PS (Recommended) or Windows PCL6.
Select either the 32-bit_x86 or 64-bit_x64 folder depending on your Widows OS version.
Select the .inf file, click Open and then OK.
Choose the appropriate printer model from the list displayed, and then click Next.
On the Printer Name and Sharing Settings window
Change the printer name if desired.
Select Do Not Share this printer. (A USB connection is only supported on the computer that is directly connected to the printer.)
Click Next.
The printer is ready to be installed. Review the printer settings and then click Next to install the printer.
Do not click print a test page. To complete the installation, click Finish.
To Install the Print Driver Downloaded from Xerox.com/Support:
If you have not done so already, download the print driver from Xerox.com/Support or click on the Drivers and Downloads link in the Related Content section on this page to be directed to the drivers and downloads page for your printer.
Choose either of the following:
PostScript Print Driver - Xerox User Interface - Microsoft Certified (Recommended)
PCL6 Print Driver - Xerox User Interface - Microsoft Certified.
Click accept to download the driver zip files.
Click Open to download and open the zip file.
When the download is complete, select Extract all to extract the files to a known location. For example: C:\Xerox\VersaLink_C8000_C9000_5.628.1.0_PS_x64
Select Extract. A folder will open where the files are located. Make note of this location.
Navigate to the list of printers on the computer and select Add a printer.
For Windows 10 OS, click Start, type Control Panel into the search box, click Control Panel, click Devices and Printers.
For Windows 8.1 OS, right-click on Start, click Control Panel, click Devices and Printers.
For Windows 7 OS, click Start, Devices and Printers.
Make sure the printer is disconnected from USB.
NOTE: On Windows 7, select Add a Local Printer. On Windows 10 you may need to select The printer that I want isn’t listed.Select Add a local printer or network printer with manual settings and click Next.
On the Choose a printer port window, leave Use an existing port selected and do not change which port is selected. The USB port that Windows creates will be selected later.
Click Next.
On the Choose the appropriate printer model from the list window, click on the Have Disk… button. The Install From Disk window will be displayed.
Click on the Browse] button, find the Xerox Software Disk, then browse to the location of the folder where the driver files are located. For example: C:\Xerox\VersaLink_C8000_C9000_5.628.1.0_PS_x64
Select the .inf file, click Open then OK.
Choose the appropriate printer model from the list displayed, and then click Next.
If asked which version of the driver do you want to use, select Replace the current driver and click Next.
Click Next on the Type a printer name window. Do not change the printer name at this point.
On the Printer Sharing window, do not select Share this printer. A USB connection is only supported on the computer that is directly connected to the printer. Click Next.
The printer driver has been installed. Click Next.
On the You've successfully added the printer window:
Do not set as default printer.
Do not click print a test page.
Click Finish.
Connect the Printer to a Computer Using USB
To connect the printer to the computer using a USB cable:
Navigate to the list of printers on the computer.
For Windows 10 OS, click Start, type Control Panel into the search box, click Control Panel, click Devices and Printers.
For Windows 8.1 OS, right-click on Start, click Control Panel, click Devices and Printers.
For Windows 7 OS, click Start, Devices and Printers.
Make sure the printer is disconnected from USB.
Right-click on the print queue for the printer, and click on Remove Device.
When the printer is no longer listed in the Devices and Printers window, reconnect the USB cable. If the computer has speakers, make sure you hear the USB connection sound.
Windows should now automatically create a USB port and configure the USB printer using the driver you have installed. When Windows completes the configuration of your USB printer, attempt to print to the printer.
NOTE: The driver may need further configuration for the options of the device. See the Related Content for additional information.