How To Disable 2-Sided (Duplex) Printing
- Product support for
- VersaLink C8000 Color Printer, VersaLink C8000W Color Printer, VersaLink C9000 Color Printer
- Article ID
- KB0136270
- Published
- 2020-10-06
For Microsoft Windows
Two-Sided printing is enabled by default on Xerox print drivers that utilize Earth Smart Settings. Earth Smart settings allow you to reduce environmental pollution by reducing the use of materials and energy in the printing process and displays a visual representation of the savings made.
Disable Two-Sided Print On a Per-job basis in the Application
Open the file to be printed, and then select Print from the File menu. The Print window will be displayed.
Select the required printer, and then click on the Preferences or Properties button. The Preferences or Properties window will be displayed.
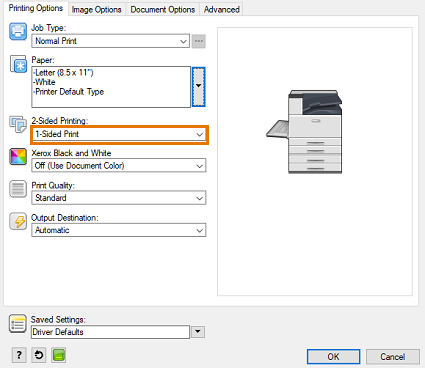
Make sure 1-Sided Print is selected from the 2-Sided Printing pull-down menu.

NOTE: If the 2-Sided Print option is grayed out, click on the Earth Smart Settings button (green box) at the bottom left of the window, uncheck 2 Sided Print, and then click on OK.Click on OK.
Click on OK again to send the job to the printer.
Disable Two-Sided Print in the Print Driver and save as a default setting
Open the Printers window.
For Windows 10 OS, click Start, type Control Panel into the search box, click Control Panel, then click Devices and Printers.
For Windows 8.1 OS, right-click on Start, click Control Panel, then click Devices and Printers.
For Windows 7 OS, click Start, then Devices and Printers.
Right-click on the printer icon, and then select Printing Preferences. The Printing Preferences window will be displayed.
Make sure 1-Sided Print is selected from the 2-Sided Printing pull-down menu.
Click on the Earth Smart Settings button (green box) at the bottom, left of the window.
Remove the check mark from the 2-Sided Print check box.
NOTE: If the 2-Sided Print option is grayed out, click on the Earth Smart Settings button (green box) at the bottom left of the window, uncheck 2 Sided Print, and then click on OK.If the setting was modified, click on the Apply button to save the new setting.
Click on the OK button to close the Printing Preferences window.
Close the Printers window.
NOTE: You will need to save your work in any open application and restart that application to load the defaults that you just modified in the print driver.
For Apple Macintosh
Open a document, click on the File menu, and then select Print.
Select the correct printer.
Select Xerox Features from the pull-down menu.
NOTE: If using Safari or Text Edit and do not see a pull- down menu, click on the arrow to the right of the print queue name to expand the window or choose Show Details. Select Xerox Features from the pull-down menu.Make sure 1-Sided Print is selected from the 2-Sided Printing pull-down menu.
NOTE: If the 2-Sided Print option is grayed out, click on the Earth Smart Settings button (green box) at the bottom left of the window, uncheck 2 Sided Print, and then click on OK.To these save settings, click on the Presets menu and select Save Current Settings as Preset.
Enter a name for the preset, such as "No Duplex".
Next to Preset Available For:
Select Only This Printer to save the setting only for this print queue. The preset will be deleted if this print queue is deleted.
Select All printers to save the setting for this print queue and to make it available for other printer installs even if this print queue is deleted.
NOTE: Creating a preset is necessary to save the changes made for the duplex and banner page options. If the preset is set back to "Standard" or "Standard Presets" when printing, the printer will automatically duplex the job and print banner pages as, by default, that is how those two presets are configured.
Click on OK to save the preset
Click on Print to send the job to the printer.
NOTE: The new preset will be the default setting for this print queue when printing from any application. To disable the preset select Default Settings or select another saved preset to use different saved settings.