Use the Xerox Precise Color Meter
- Product support for
- VersaLink C9000 Color Printer
- Article ID
- KB0135187
- Published
- 2022-07-26
Powered by industry-leader X-Rite, the Xerox Precise Color Meter device calibrates your monitor and the VersaLink C9000 to match colors from swatch books or color tables, ensuring accurately matched screen-to-print colors.
NOTES:
This solution applies to the VersaLink C9000 Color Printer only. The Xerox Precise Color Meter comes standard with all VersaLink C9000 Color Printers.
Several related videos are available at the end of this solution.
Components of the Xerox Precise Color Meter:

Component | Description |
|---|---|
1 - Rotary Disk | Used to set measurement mode |
2 - Target Flag | Used to measure small color patches |
3 - Target Lock | Used to unlock and lock Target Flag |
4 - Button | Used to trigger measurements |
Before You Start Using the Xerox Precise Color Meter:
Download and install the Xerox Precise Color Management System application onto your computer. The software can be downloaded from the Xerox Drivers and Downloads page. To access the Drivers and Downloads page, click on the link in the Related Content section.
Make sure that the software is installed before you attach the USB cable to the back of your Xerox Precise Color Meter and plug it into your computer.
To Measure Color Patches Using the Xerox Precise Color Meter:
Choose the measurement mode that you want to work with by turning the Rotary Disk. The following modes are available:
Ambient Light Measurement mode
Note: The Ambient Light Measurement mode is an OEM feature and is not supported by the Xerox Precise Color Management System (PCMS).Auxiliary
Instrument Calibration mode
Monitor, Chart Scanning and Spot measurement mode

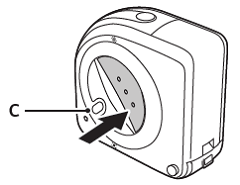
Before you start measuring, calibrate the device. Turn the Rotary Disk to position C, and trigger the measurement by pushing the Measurement Button. Allow the Precise Color Meter a few seconds to calibrate.
Measure the color of a single patch. Choose measurement mode D. Unlock the Target Flag by pressing the Lock Button.

The unlocked Target Flag helps you to accurately position the Precise Color Meter over the color patch. Lower the Precise Color Meter to the patch, and trigger the measurement by pressing the Button.

After making the spot measurement, lock the Target Flag by pushing the Target Lock button in the opposite direction.

Follow these steps for successful scanning of patches on the color chart:
Make sure Target Flag is locked while scanning.
Start by placing the device on the test chart. Make sure the measurement aperture (indicated through indicator lamp) is positioned on white area of the paper at the beginning of the column.
Press the Button.
Start scan by gliding along row using gentle pressure.
Release the Button at the end of the measured column in white area. (Put several blank sheets of the same paper underneath the test chart paper for proper color measurement.)

The bag allows you to affix the Precise Color Meter to your monitor. It also protects the Precise Color Meter and serves as a transport bag.

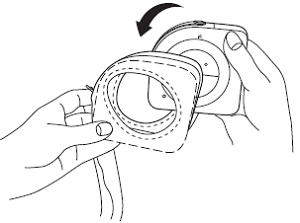
Open the zipper of the bag and insert the Precise Color Meter. Be sure to insert correctly, matching shape of bag to shape of device.
Connect the Precise Color Meter with the USB cable. Close the zipper of the bag. Before you start the screen calibration, make sure that you have opened the closure at the bottom of the bag.

Use the Velcro patches on the strap of the bag to best accommodate your screen model. Smaller screens may require the strap to be folded.

Affix Precise Color Meter in the middle of your display and start calibration by triggering from the software application.

RELATED VIDEOS: