Replace the Feed Rollers
- Product support for
- Phaser 6500
- Article ID
- KB0092330
- Published
- 2016-04-14
WARNING: The Fuser and surrounding area may become hot during operation. To avoid injury, be careful while working in this area.
CAUTION: Do not use warm water or cleaning solvents to remove Toner (Dry Ink) from your skin or clothing. This will set the Toner and make it difficult to remove. If any Toner gets on your skin or clothing, use a brush to remove the Toner, blow it off, or wash it off with cold water and mild soap.
To replace the Feed Rollers in the Paper Tray / Manual Feed Slot (MFS):
Remove the paper tray from the printer. The roller in the paper tray cavity is easier to replace when the tray is removed.

Remove the roller assembly in the front of the paper tray:
Remove the paper from the paper tray.
Press on the spring loaded roller shaft tabs on the front of the tray.

Lift out the roller assembly and discard it.

Remove a new roller assembly from its package, and snap the new assembly into place.
Power the printer off using the power switch located on the left side of the printer, toward the back.

Press the button on the top, right side of the printer to open the Front Cover.

Lower the Transfer Belt by pulling on the green tabs. Be careful not to touch the belt.

Locate the Imaging Unit, and then turn the four twist-locks to the left to unlock the unit.

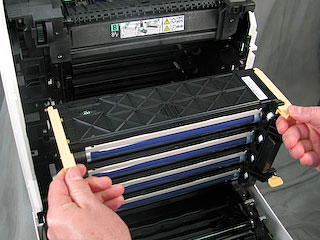
Grasp the Imaging Unit by the colored pull-tabs on the top edge. Pull the unit forward and up and then out of the printer.

Place the Imaging Unit on a flat surface and cover the unit with a sheet of paper.
CAUTION: Do not drop or shake the Imaging Unit after it has been removed from the printer as Toner spills can occur.
Do not expose the Imaging Unit to any light source for more than five minutes. Prolonged exposure to light may damage the unit. Do not touch the shiny Transfer Belt.Look inside the printer where the paper tray was installed and locate the Feed Roller in the bottom center.

Unclip the lock-collar on the end of the roller by raising the retaining tab.

Slide the collar and the roller to the left until the assembly rotates.

Rotate the Roller downward until the Feed Roller falls through to the paper tray cavity below. Reach into the cavity and retrieve the roller.

From inside the paper tray cavity, insert the new Feed Roller up and onto the shaft.

Rotate the roller, while sliding it on the shaft, until the retaining clip on the roller fits into place.

Slide the lock-collar towards the Feed Roller until it locks into position.

Re-install the Imaging Unit.
Grasp the unit by its peach-colored pull-tabs on the top edge and install the unit in the printer. Make sure to insert the unit into the left and right side guides in the printer, and then push the unit all the way back into the printer.

Turn the four twist-locks to the right, to lock the unit.

Raise the Transfer Belt back into its original position. Make sure it clicks into place.

Close the Front Cover.

Re-install the paper tray.

Power the printer on. A "Ready to Print" message will be displayed on the Display Screen.
