Replace the Transfer Unit Kit
- Product support for
- Phaser 6600
- Article ID
- KB0091421
- Published
- 2017-06-30
The Transfer Unit kit includes the transfer belt, transfer roller, and cassette roller. Replace all three units at the same time.
CAUTION: Do not use warm water or cleaning solvents to remove Toner (Dry Ink) from your skin or clothing. This will set the Toner and make it difficult to remove. If any Toner gets on your skin or clothing, use a brush to remove the Toner, or wash it off with cold water and mild soap.
For additional product and material safety information, click on [Xerox Environment, Health and Safety] in the Related Content section.
CAUTION: If the optional Productivity Kit (HD) is not installed, make sure the Ready LED is off before powering off the printer. The data in the memory is cleared when the printer is powered off.
Power the printer off. See the Related Content section for additional information.

Open the Right Side Door.

Push down on the release button, and lower the Rear Door into the open position.

Remove the Waste Cartridge:
On the right side of the printer, unlock the Waste Cartridge, rotate the lever 90-degrees to the left.

Grasp the handle of the Waste Cartridge, then pull the cartridge out of the printer. To prevent Toner spills, keep the openings in the cartridge, face-up.

NOTE: Be careful not to spill Toner when handling the Waste Cartridge. After removing the cartridge, do not touch the Toner port.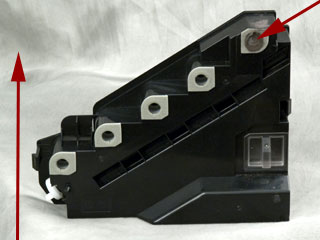
CAUTION: To avoid Toner spills or malfunction, do not place the Waste Cartridge on its side.Place the Waste Cartridge on a level surface.
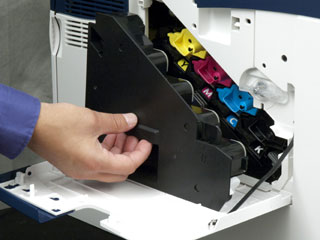
Replace Transfer Belt and Clean the Color Toner Density Sensor:
Open the Top Cover.

Grasp the handles on either side of the Transfer Belt and pull the belt out of the printer.

Place the old belt aside for recycling.
On the back of the printer, use a dry cotton swab to clean the color Toner density sensors.

Remove the new Transfer Belt from the packaging.
Remove the clips on either side of the transfer unit.
CAUTION: Do not touch the surface of the Transfer Belt.Remove the protective film from around the Transfer Belt.
Line up the tabs on either side of the new Transfer Belt with the slots in the printer, and then push the belt into the printer until the belt clicks into place.
Close the Top Cover.

Reinsert the Waste Cartridge:
NOTE: If the Waste Cartridge does not fit into place properly, make sure the belt is fully inserted.
Reinsert the Waste Cartridge.
To lock the Waste Cartridge, rotate the lever 90-degrees to the right. When the lever is vertical, the cartridge is locked in position.

Close the Right Side Door.

Replace the Transfer Roller:
On the back of the printer,
Squeeze the levers together on either side of the Transfer Roller, and then lift the Transfer Roller out of the printer.

Place the old Transfer Roller aside for recycling.
Remove the new Transfer Roller from the packaging.
Insert the new Transfer Roller into the printer. Make sure the roller clicks into place.
Close the Rear Door.

Replace the Cassette Roller, Power On, and Reset the Counter:
Remove paper Tray 1.
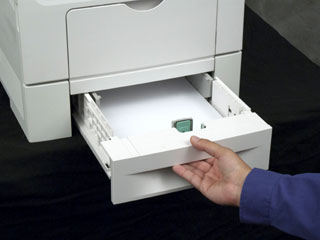
Turn the paper tray until the back of the tray is facing you. This allows access to remove Cassette Roller.
Locate the Cassette Roller on the back of the tray.
Release the latch on the right side of the Cassette Roller.
Remove the old roller. The roller will slide off in the opposite direction of where the latch is located.

Place the old Cassette Roller aside for recycling.
Remove the new Cassette Roller from the packaging.
Insert the new Cassette Roller and then gently pushing the roller down into position. The roller will click into place.

NOTE: Make sure the locking latch on the end of the roller is locked into position.Insert the paper tray.
Power the printer on. See the Related Content section for additional information.
Reset the counter. See the Related Content section for additional information.