Clean the LED Windows
- Product support for
- Phaser 6000, Phaser 6010, Phaser 6020, Phaser 6022, WorkCentre 6015, WorkCentre 6025, WorkCentre 6027
- Article ID
- KB0048352
- Published
- 2019-01-14
CAUTION:Do not use warm water or cleaning solvents to remove toner (Dry Ink) from your skin or clothing. This will set the toner and make it difficult to remove. If any Toner gets on your skin or clothing, use a brush to remove the toner, or wash it off with cold water and mild soap.
Do not expose the inside of the printer to strong light. Minimize exposure to light to five minutes or less if possible.
NOTE: The images in this procedure are for demonstration purposes only and may not specifically match your printer model; colors, icons, and other minor differences may exist.
Power off the printer by pressing the power switch to the off (O) position.
NOTE: The power switch is located on the right side of the printer.Unplug the power cord from the back of the machine.
As a precaution, place a few sheets of paper under the Toner Cartridge area to catch any toner that may spill.
Open the Toner Access Cover.
Pinch the Toner Cartridge Release Lever upward, and then pull out slowly to remove the cartridge.

NOTE: Do not touch any toner that may cling to the cartridge.Place the cartridge on the paper with the label side down to prevent spillage.
Repeat the process to remove the other three cartridges.

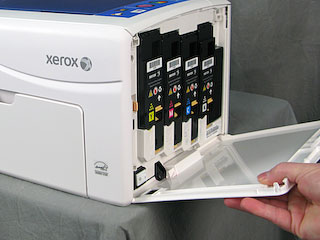
Pull out the cleaning rod to remove it from the printer.

NOTE: To remove toner and debris from the top of the cleaning rod, wipe it with a clean lint-free cloth.Insert the cleaning rod into the hole beside the arrow in the first toner slot.

Push the cleaning rod into the printer until it stops, and then pull it out of the printer.

Repeat the process for each of the other three holes.

Return the cleaning rod to its original location.

Align the Toner Cartridge to the slot by aligning the geared post with the hole, and then insert the cartridge firmly by pressing in on the center of the label until the cartridge clicks in place.

Repeat the process for each of the other three cartridges.

Close the Toner Access Cover.
