Clear Jams in the Document Feeder
- Product support for
- AltaLink B8145 / B8155 / B8170 Multifunction Printer
- Article ID
- KB0029069
- Published
- 2021-11-01
Duplex Automatic Document Feeder Jams
If a jam occurs in the duplex automatic document feeder areas, a message appears to indicate the areas that require clearing. To clear the jam, clear the areas indicated, then reorder and reload your original documents in the document feeder input tray. The device continues scanning the job from the point the job stopped, only scanning the original documents remaining.
If your device has the multi-feed sensor installed and enabled, the device can detect if a multi-feed of original documents is going through the duplex automatic document feeder. If a multi-feed condition occurs, the device stops scanning and a message appears at the control panel. The message indicatesa jam in the duplex automatic document feeder. The user can reload the original documents and continue the job with or without multi-feed detection enabled for that job, or cancel the job.
To clear the jam:
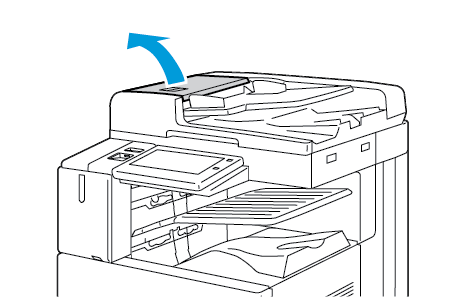
Lift the lever and open the top cover of the document feeder.
If the original document is not caught in the entry to the document feeder, pull the document straight out in the direction shown.

Clear the document feeder area. The instructions vary depending on your printer model:
If the message on the control panel instructs you to turn the green wheel, turn the wheel in the direction shown. Turning the green wheel moves the original document out of the feeder. Remove the jammed document in the direction shown, then close the document feeder top cover.

If the message on the control panel instructs you to clear the document feeder left cover area, remove the jammed original document in the direction shown. Close the document feeder top cover, then close the document feeder left cover.

Lift the document feeder, then remove the original document from the document glass.

To access the second-side scanning lens assembly, on the left side of the document cover, lower the lever. Remove the original document in the direction shown.

If the original document is not visible when the document feeder is opened, close the document feeder. Lift the document feeder tray, then remove the jammed paper.

Lower the document feeder tray.
If the original document is not wrinkled or torn, load document into the feeder again, following the instructions on the control panel. If your device has the multi-feed detection sensor, do one of the following:
To continue the job with multi-feed detection enabled, touch Try Again.
To continue the job without multi-feed detection enabled, touch Suppress Multi-feed Detection.
To cancel the job, touch Cancel Job.
Note:After clearing a document-feeder jam, reload the entire document, including the pages that are scanned already. The printer skips the scanned pages automatically, then scans the remaining pages.
Caution: Torn, wrinkled, or folded original documents can cause jams and damage the printer. To copy torn, wrinkled, or folded original documents, use the document glass.
Use a sheet of cardstock or heavyweight paper to clear the jam:
Locate a sheet of cardstock or heavyweight paper.
Lift the lever and open the top cover of the document feeder.
Lift the Document Cover to remove any originals in this area.
Check for staples or paper clips caught in the pathway.
Manually feed the sheet of cardstock through the feeder to dislodge any blockage.
Close the Document Cover and the Top Cover and try your job again.
See Also:
Duplex Automatic Document Feeder and Document Glass Guidelines