Replace the Fuser Assembly
- Product support for
- AltaLink C8130 / C8135 / C8145 / C8155 / C8170 Color Multifunction Printer
- Article ID
- KB0028898
- Published
- 2021-11-08
NOTE: A Video is available at the end of this article.
NOTE: The machine will display a message on the Touch Screen when it is time to order and install a new Fuser Assembly.
NOTE: Before start unplug the printer.
![]() CAUTION: The Fuser Assembly may be very hot and should be handled with care! Use the lifting handles on each end to avoid any contact with hot surfaces during removal or replacement. Avoid any contact with internal parts of the cartridge.
CAUTION: The Fuser Assembly may be very hot and should be handled with care! Use the lifting handles on each end to avoid any contact with hot surfaces during removal or replacement. Avoid any contact with internal parts of the cartridge.
Power off the printer using both power switches; press the power switch on the control panel, then open the front door and press the second power switch. Close the door. For additional information, click on Power On or Exit Sleep Mode or Power Off, Place in Sleep Mode or Restart the Device.

Unplug the power cord from the wall outlet.
 WARNING: Allow the fuser to cool for at least 40 minutes.
When the fuser has cooled, open Door A on the side of the printer.

Locate the orange release latch to the left of the fuser. Lift up on the latch and then slide it to the left.

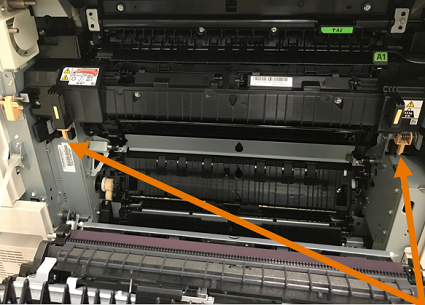
Locate the two orange release latches on each side of the fuser. Lift up the latches and slide inward to release the fuser.

Holding the release tabs, pull the fuser out of the printer and then insert the new fuser into the printer until you hear a click.


Slide the latch to the right and then press down to lock the latch into position.

Plug the power cord back into the wall out. Power on the printer by pressing the power switch on the front of the printer, close the door, and then press the power switch on the control panel.

Video: