Streaks, Lines or Spots on Copies and Prints
- Product support for
- WorkCentre 7830/7835/7845/7855, WorkCentre 7830i/7835i/7845i/7855i
- Article ID
- KB0014331
- Published
- 2021-03-24
Streaks, lines or spots on copies and prints can be caused by contamination, dirt or debris within the paper path, such as on the printhead lenses or transfer belt. Such defects can also be caused by using old or damp paper supplies or paper not within the machines proper specifications.
Step 1: Clean the Printhead Lenses
Step 2: Reseat the Drum Cartridges
Step 3: Check the Intermediate Belt Transfer (IBT) Cleaner
Step 4: Reseat the Waste Toner Container
Step 5: Print a Repeating Defects Page
Step 6: Replace the Appropriate Drum Cartridge
Step 7: Replace the Fuser Assembly
Materials required:
Cloth to wipe hands, if necessary.
Scrap paper to protect the floor when reseating the Waste Toner Container.
New Drum Cartridge.
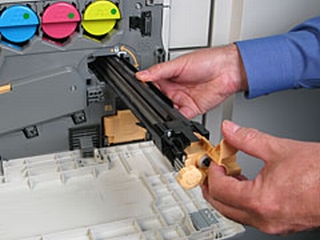
Step 1: Clean the Printhead Lenses
Video:
Before you begin, make sure the printer is not copying or printing.
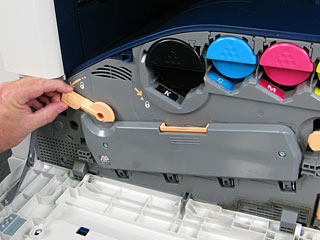
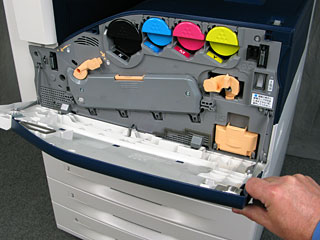
Open the Front Cover of the printer.
Turn the orange lever to the left and pull the Drum Cartridge Cover down until it clicks into position.
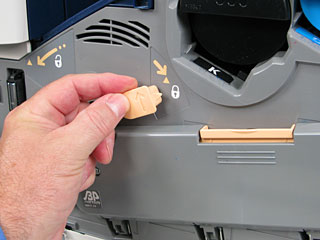
Locate and clean the four printheads. Each printhead has its own cleaning tool. Note that the printhead lens cleaner do not detach from the printer.
Slowly pull the printhead lens cleaner out until the three dots are visible.
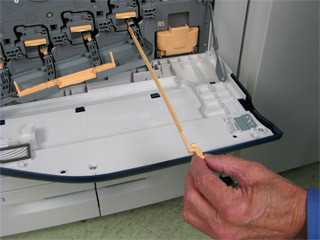
Slowly push the printhead lens cleaner back into the printhead until it stops. Repeat two or three times.
Repeat steps 1 and 2 for each printhead.
Close the Front Cover.
Make a few copies/prints. If the problem persists, continue with the next step.
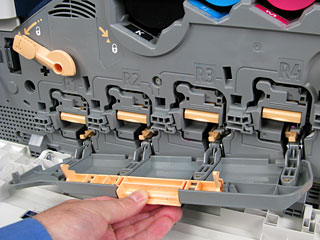
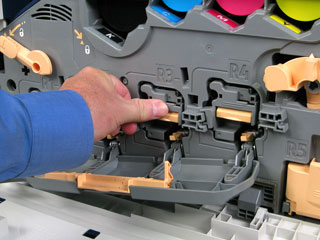
Step 2: Reseat the Drum Cartridges
Video:
Open the Front Cover.
Grasp the orange handle of the first Drum Cartridge and gently pull it out of the printer.

Push the cartridge into the machine until it stops.
Repeat steps 1 and 2 for the remaining cartridges.
When finished, close the Drum Cartridge Cover.
Turn the release lever on the left side of the cover to the right to lock the cartridges into position.
Close the Front Cover.
Make a few copies/prints. If the problem persists, continue with the next step.
Step 3: Check the Intermediate Belt Transfer (IBT) Cleaner
WARNING: The blade on the IBT Cleaner is very sharp. To avoid injury, do not touch the blade when handling the IBT Cleaner.
Open the Front Cover and locate the IBT in area R6.
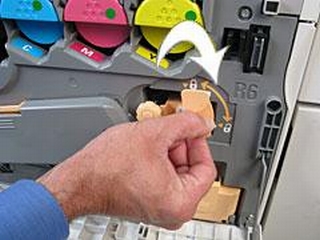
Move the sliding cover on R6 to the right. Rotate the knob to the left to pop out the knob.
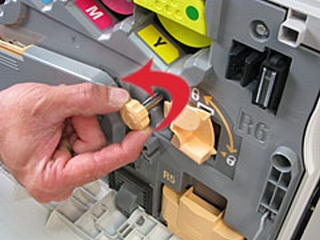
Pull on the knob to remove the IBT Cleaner.
Inspect the blade on the IBT Cleaner for paper and debris. Do not to touch the blade. (Replace the IBT Cleaner if the cleaner blade appears damaged or very dirty.)
Re-insert the IBT Cleaner into the slot.
Press in the knob and rotate it to the right.
Slide the R6 cover to the left to lock the IBT Cleaner in place.
Close the Front Cover and make a few copies/prints. If the problem persists, continue with the next step.
Step 4: Reseat the Waste Toner Container
Open the Front Cover and locate the Waste Toner Container in area R5.
Slowly pull the container out of the printer while supporting it with your other hand.

To reinsert the container into the printer, hold the left side of the container and slide it into the printer until it clicks.
Close the Front Cover and make a few copies/prints. If the problem persists, continue with the next step.
Step 5: Print a Repeating Defects Page
Print the Repeating Defects page to help identify the part of the printer that is causing repeating defects on the output.
Video:
Press the [Machine Status] button on the Control Panel. The Machine Status will be displayed on the Touch Screen.
Select the [Tools] tab.
Select the [Troubleshooting] button.
Select [Support Pages], then [Repeating Defects Page], and then select [Print]. The pages will print.
To identify the part responsible for the repeating spots or lines, follow the instructions on the Repeating Defects page. To correct the problem, replace the printer part identified on the Repeating Defects page.
If the problem persists, contact Support for additional assistance.
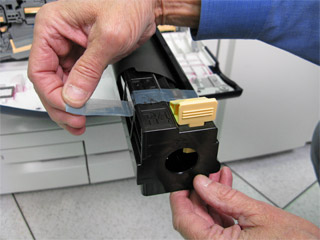
Step 6: Replace the Appropriate Drum Cartridge
CAUTION: Do not expose the Drum Cartridges to direct sunlight or strong indoor fluorescent lighting. Do not touch or scratch the surface of the drum.
IMPORTANT: Place any suspected defective cartridge that is removed from the printer in protective wrapping/packaging material for situations where it may still be a functioning cartridge. If you do not have the original packaging material, use the packaging from the new cartridge.
Remove the new Drum Cartridge from its packaging and place it on a flat surface near the machine. Do not place the Drum Cartridge upright or remove the black protective sheet from the cartridge.
Make sure the machine has stopped copying / printing.
Open the Front Door of the printer.
Turn the release lever on the left side of the Drum Cartridge Cover to the left to unlock the cover.
Pull the cover open to access the four Drum Cartridges.
Grasp the orange handle of the appropriate Drum Cartridge and gently pull it out of the printer.
Place the used cartridge in the bag supplied in the package and put it in the box that the new cartridge came in.
NOTE: To return the used Drum Cartridge for recycling, follow the instructions included with the new cartridge. If the instructions or shipping label are not available, click on the [Recycling] link in the Related Content section for additional information.Remove the styrofoam/packaging from the end of the new cartridge.
Rest the new cartridge (in its black plastic protective shield) in the small square cartridge slot on the printer. Make sure to load the cartridge in the direction of the arrow on the top of the shield. You will hear a click when the cartridge is positioned properly in the slot.

Remove the black paper by pulling it to the left.

Pull off the tape from the top of the cartridge shield.
Hold the shield and push/slide the orange handle toward the printer until the handle stops. This will install the cartridge in the machine.
Remove the protective shield from the slot and set it aside.
Push the cartridge into the machine until it clicks into position.
Close the Drum Cartridge Cover.
Turn the release lever on the left side of the Drum Cartridge Cover to the right to lock the Drum Cartridges into position.
Close the Front Door. If the Front Door is not completely closed a message will be displayed and the machine will not operate.
Dispose of the protective shield and tape as normal office waste.
Step 7: Replace the Fuser Assembly
Video:
WARNING: The Fuser Assembly may be very hot and should be handled with care! Use the lifting handles on each end to avoid any contact with hot surfaces during removal or replacement. Avoid any contact with internal parts of the cartridge.
Damage to a work surface may result if a hot Fuser Assembly is removed and positioned on an unprotected surface. Place the assembly on a minimum of 10 sheets of paper.
IMPORTANT: Place any suspected defective cartridge that is removed from the printer in protective wrapping/packaging material for situations where it may still be a functioning cartridge. If you do not have the original packaging material, use the packaging from the new cartridge.
Power off the machine.
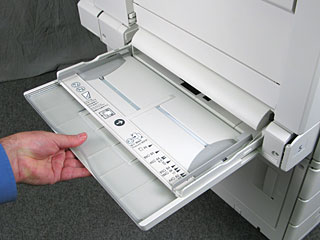
Open the Bypass Tray (Paper Tray 5), located on the left side of the printer, by rotating it outward.
Lift up on the release lever on the Top Left Cover A to open the cover.

Wait at least 40 minutes for the Fuser Assembly to cool.
When the Fuser has cooled, remove the Fuser Assembly by rotating the orange screws (on each side of the assembly) to the left until they are completely loosened.
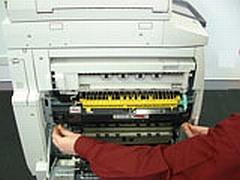
Grasp the Fuser Assembly by the two handles and pull it straight out of the machine.

NOTE: To return the used module for recycling, follow the instructions included with the new module.Remove the new Fuser Assembly from its packaging.
Hold the assembly by the two handles and then insert it into the machine.
Tighten the two locking screws (rotate to the right).
Close the cover.
Close the Bypass Tray, if necessary, and then power on the machine.