Remove, Rotate and Reinsert (Reseat) the Fuser Assembly
- Product support for
- WorkCentre 7525/7530/7535/7545/7556, WorkCentre 7830/7835/7845/7855, WorkCentre 7970
- Article ID
- KB0014321
- Published
- 2024-05-06
WARNING: The Fuser Assembly may be very hot and should be handled with care! Use the lifting handles on each end to avoid any contact with hot surfaces during removal or replacement. Avoid any contact with internal parts of the cartridge.
Damage to a work surface may result if a hot Fuser Assembly is removed and positioned on an unprotected surface. Place the assembly on a minimum of 10 sheets of paper.
Power off the machine. See the Related Content for additional Information.
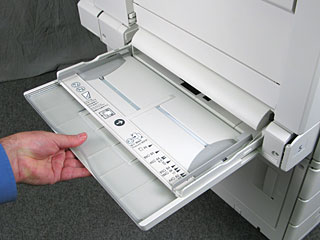
Open the Bypass Tray (Paper Tray 5), located on the left side of the printer, by rotating it outward.
Lift up on the release lever on the Top Left Cover A to open the cover.

Wait until the Fuser Assembly is cold enough to remove safely.
When the Fuser has cooled, remove the Fuser Assembly by rotating the orange screws (on each side of the assembly) to the left until they are completely loosened.
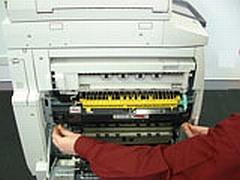
Grasp the Fuser Assembly by the two handles and pull it straight out of the machine.

Place Fuser down and allow to cool if still hot.
Inspect the orange Fuser Belt for Damage. If Damaged then follow steps 10.
If undamaged and no debris visible, Rotate the white gear (shown in right of picture) to rotate the fuser. It may be difficult to rotate at first, rotate until it has minimal resistance.

Hold the assembly by the two handles and then reinsert it into the machine.
Tighten the two locking screws (rotate to the right).
Close the cover.
Close the Bypass Tray, if necessary, and then power on the machine. If the Fuser had visible damage you will still have an error but may be able to scan until the Fuser is replaced.