Replace the Appropriate Drum Cartridge(s)
- Product support for
- WorkCentre 7830/7835/7845/7855, WorkCentre 7970
- Article ID
- KB0014319
- Published
- 2018-10-31
A message will be displayed on the Control Panel when a Drum Cartridge needs to be replaced.
CAUTION: Do not expose the Drum Cartridges to direct sunlight or strong indoor fluorescent lighting. Do not touch or scratch the surface of the drum.
IMPORTANT: Place any suspected defective cartridge that is removed from the printer in protective wrapping/packaging material for situations where it may still be a functioning cartridge. If you do not have the original packaging material, use the packaging from the new cartridge.
Remove the new Drum Cartridge from its packaging and place it on a flat surface near the machine. Do not place the Drum Cartridge upright or remove the black protective sheet from the cartridge.
Make sure the machine has stopped copying / printing.
Open the Front Door of the printer.
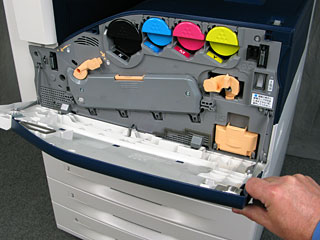
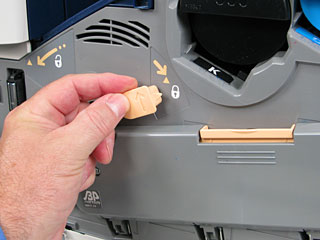
Turn the release lever on the left side of the Drum Cartridge Cover to the left to unlock the cover.
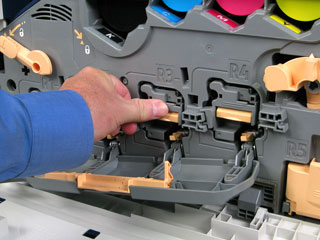
Pull the cover open to access the four Drum Cartridges.
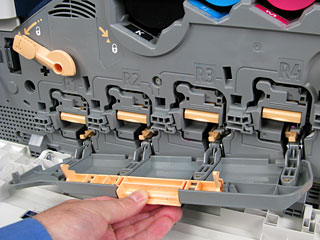
Grasp the orange handle of the appropriate Drum Cartridge and gently pull it out of the printer.

Place the used cartridge in the bag supplied in the package and put it in the box that the new cartridge came in.
NOTE: To return the used Drum Cartridge for recycling, follow the instructions included with the new cartridge. If the instructions or shipping label are not available, click on the [Recycling] link in the Related Content section for additional information.Remove the styrofoam/packaging from the end of the new cartridge.
Rest the new cartridge (in its black plastic protective shield) in the small square cartridge slot on the printer. Make sure to load the cartridge in the direction of the arrow on the top of the shield. You will hear a click when the cartridge is positioned properly in the slot.

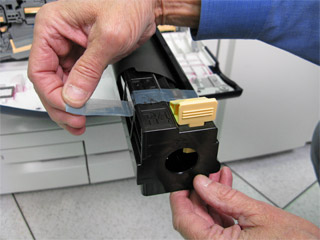
Remove the black paper by pulling it to the left.

Pull off the tape from the top of the cartridge shield.
Hold the shield and push/slide the orange handle toward the printer until the handle stops. This will install the cartridge in the machine.
Remove the protective shield from the slot and set it aside.
Push the cartridge into the machine until it clicks into position.
Close the Drum Cartridge Cover.
Turn the release lever on the left side of the Drum Cartridge Cover to the right to lock the Drum Cartridges into position.
Close the Front Door. If the Front Door is not completely closed a message will be displayed and the machine will not operate.
Dispose of the protective shield and tape as normal office waste.