Make Sure SMart eSolutions is Setup Correctly, Configure the Proxy Server, and Create a Machine Digital Certificate as Required
- Product support for
- WorkCentre 7220/7225
- Article ID
- KB0230083
- Published
- 2016-02-10
IMPORTANT: Setting up SMart eSolutions requires knowledge of your network and network settings. If necessary, contact your Network or System Administrator for assistance.
Open CentreWare Internet Services (CWIS). See the Related Content for additional information.
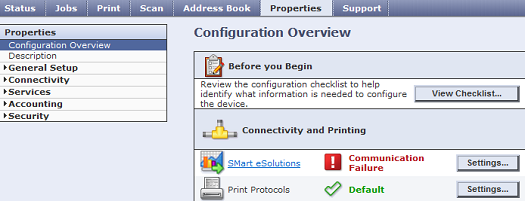
Click on the [Properties] tab.
NOTE: Users may be required to login as a System Administrator to view or modify settings within CWIS. If prompted, login using the System Administrator username and password. The default username is "admin", and the default password is "1111".Click on [Configuration Overview] on the left side of the page. The Configuration Overview window will be displayed.
View the status displayed for SMart eSolutions in the Connectivity and Printing area.
If "Fully Configured and Communicating with Xerox" is displayed, the setup has been successful. No further action is required.
If "Communication Failure" is displayed, continue with step 5.

Click on [Settings] to the right of SMart eSolutions and make sure that the Enrolled radio button is selected. If it is not selected, select it and then make sure to click on [Apply] to save the change.
If the network that the printer connects to requires a proxy server to access the Internet, the proxy server information must be configured correctly in the printer. When a proxy server must be enabled:
If "Not Configured" is displayed for the HTTP Proxy Server, continue with step 8.
If "Configured" is displayed for the HTTP Proxy Server, skip to step 13.
If a proxy server is not required, skip to step 13.

Click on the [Configure] button. The Proxy Server window will be displayed.
NOTE: Machines cannot be connected directly with a proxy server that requires authorization or authentication (login and/or password). If authorization or authentication is required, proxy connectivity software, Xerox Device Agent (XDA) or CentreWare Web, must be used.
To access the required software download link(s) and documentation, go to the Xerox SMart eSolutions website. See the Related Content for additional information.Select the [Enabled] check box.
Select either [IPv4 Address], [IPv6 Address] or [Host Name].
Enter the address or host name and port number in the Proxy Server Address field.
Click on the [Save] button.
Make sure that "Configured" is now displayed to the right of HTTP Proxy Server.
NOTE: If "Configured" is not displayed, check the steps again or restart the printer.Click on [Configuration Overview] on the left side of the page. The Configuration Overview window will be displayed.
In the Connectivity and Printing area, click on [Settings] to the right of Print Protocols.
Click on [Configure] or [Edit] to the right of IP (Internet Protocol).
Make sure the Gateway address for IPv4 has been entered correctly.
Click on [Apply] if any changes were made.
Click on [DNS] near the top of the page.
Make sure that the correct details are entered for DNS Server Addresses(in order). If the field under that heading is blank, then use the boxes under Additional DNS Server Addresses (in IPv4 and IPv6 address format) to add the IP address(es) of the DNS servers.
Click on [Apply] if any changes were made.
Click on [Configuration Overview] on the left side of the page. The Configuration Overview window will be displayed.
In the Connectivity and Printing area, click on [Settings] to the right of Print Protocols.
Click on [Configure] or [Edit] to the right of HTTP:
If Secure HTTP (SSL) is enabled with a port of 443, then continue with step 34 to test communications.
If Secure HTTP (SSL) is not enabled, select the radio button next to enabled, followed by selecting [Apply] or [Save], and Machine Digital Certificate must be created. Continue with step 24.
Click on [Security] on the left side of the page to expand the list of options.
Click on [Certificates].
Click on [Security Certificates].
Click on the [Xerox Device Certificate] tab.

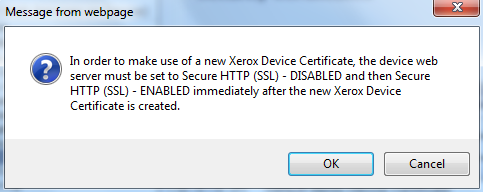
If a Xerox Device Certificate does not already exist or you need to install a specific device certificate, click on [Create New Xerox Device Certificate]. The following message will be displayed. Click on [OK]. If you do not need to install a new device certificate, continue with step 34.
"In order to make use of a new Xerox Device Certificate, the device web server must be set to Secure HTTP (SSL) - DISABLED and then Secure HTTP (SSL) - ENABLED immediately after the new Xerox Device Certificate is created."
Enter the applicable certificate information:
2 Letter Country Code
State/Province Name
Locality Name (Company Name)
Organization Name (Business Group Name)
Organization Unit (Type of Business Name)
Common Name
Subject Alternative Name
E-mail Address
Days of Validity (Required) (1-5000)
Click on [Finish].

If a new digital certificate was created,Click on [Configuration Overview] on the left side of the page.
In the Connectivity and Printing area, click on [Settings] to the right of Print Protocols.
Click on [Configure] or [Edit] to the right of HTTP:
Select the Secure HTTP (SSL) [Disabled] check box.
Click on the [Apply] button.
Select the Secure HTTP (SSL) [Enabled] check box and make sure the port number is set to 443.
Click on the [Apply] button. This will restart the HTTPS service in the printer.
Click on [Configuration Overview] on the left side of the page.
In the Connectivity and Printing area, click on [Settings] to the right of SMart eSolutions.
Click on the [Test Communication Now] button to test communication with the Xerox Communication Server. The machine will try to establish communication with the Xerox Communication Server. This may take several minutes.
If communication is established, a "Communication with Xerox successful" message will be displayed. Continue with step 39.
If a communication error message is displayed, or the Communication Test window is displayed for more than a few minutes (maximum 5 minutes), communication has failed. Restart the printer and try [Test Communications Now] again. Contact Support for additional assistance if the Test Communications Now fails after the printer has been restarted.
Click on [Configuration Overview] on the left side of the page.
If the "Fully Configured & Communicating with Xerox" is displayed for SMart eSolutions in the Connectivity and Printing area, then SMart eSolutions has been configured. Close the web browser.
NOTE: If "Communication Failure" is still displayed, contact Support for additional assistance.