Connect the Printer to a Wireless Network
- Product support for
- VersaLink C8000 Color Printer, VersaLink C8000W Color Printer, VersaLink C9000 Color Printer
- Article ID
- KB0134830
- Published
- 2020-10-06
A wireless local area network (WLAN) provides the means to connect 2 or more devices in a LAN without a physical connection. The printer can connect to a wireless LAN that includes a wireless router or wireless access point. Before connecting the printer to a wireless network, the wireless router must be configured with a service set identifier (SSID) and any necessary credentials.
Note: Wireless networking is available only on printers with the optional Wireless Network Adapter installed.
Perform the following to connect to a wireless network:
Install the Wireless Network Adapter
Connect to Your Wireless Network
To Install the Wireless Network Adapter
The optional wireless network adapter plugs in to the back of the control board. After the adapter is installed, and wireless networking is enabled and configured, the adapter is able to connect to a wireless network.
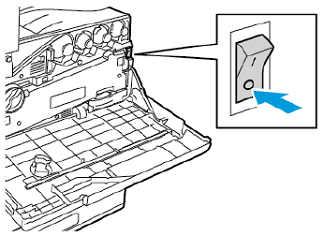
Power off the printer.
At the control panel, press the Power/Wake button, then touch Power Off.

Open the front door, then press the main power switch to the Off position.
Remove the packaging from the Wireless Network Adapter.
To install the Wireless Network Adapter, follow the instructions provided with the Wireless Network Adapter.
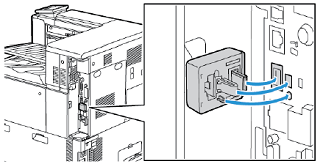
Caution: Pulling on the adapter can cause damage. After the adapter is installed, remove it only as needed, and as directed in the Wireless Network Adapter removal instructions.
To Connect to Your Wireless Network
After the Wireless Network Adapter has been installed, configure the printer to connect to the wireless network using one of the following methods.
Method 1: Connect to a Wireless Network using the Wi-Fi Wizard - The printer will display a list of available wireless networks. If the network requires a password, the machine will request the password when you select the network.
Method 2: Connect to a Network with a Wi-Fi Protected Setup (WPS) - Wi-Fi Protected Setup (WPS) is a network standard for setting up a wireless network. The WPS protocols enable you to set up devices in a secure wireless network without having wireless networking experience. With a WPS-certified router, you can use tools in the router and the printer to connect the printer to the network. To use the tools, ensure that the wireless router is configured properly and is compliant with the WPS.
Method 3: Connect to a Wireless Network Manually - When connecting to a wireless network that does not include a WPS-compliant router, set up and configure the printer manually. Before starting, obtain the router setup and configuration information, such as name and passphrase. For assistance, contact your system administrator.
Method 1: Connect to a Wireless Network using the Wi-Fi Wizard on the Touch Screen
At the printer control panel, log in as a system administrator.
Press the Log In button.
Touch or type admin.
Type the administrator password, then touch OK.
Note: Depending on when the device was manufactured, the default password may be the device serial number or 1111.
Press the Home button.
Touch Device > Connectivity > Wi-Fi.
From the list of wireless networks, select the name of your wireless network.
If required, enter the wireless network's password and touch OK.
Touch Close on the notification.
To activate your Wi-Fi setting changes, press the Home button.
At the prompt, touch Restart Now.
Method 2: Connect to a Network with a Wi-Fi Protected Setup (WPS)
Use the PBC or PIN method to connect to a WPS wireless network.
PBC (Push Button Connection) is the easiest way to connect the printer to a wireless network. It automatically connects when you push a button on the router and on the printer. After the router and printer exchange information, the printer accepts the security and configuration information from the router and connects to the network. The PBC is a moderately secure way to connect the printer to the network. You do not need to enter any information to make the network connection.
PIN (Personal Identification Number) automatically connects the printer to a wireless router using a common PIN. The printer generates and prints a PIN for use in the setup process. When you enter the PIN into the router, the router broadcasts network information using the PIN. When both devices recognize the PIN, the router provides the security and configuration information to the printer, which uses it to connect to the network.
To connect to a WPS wireless network using the PBC option:
NOTE: Before you install the device, ensure that the wireless router is configured properly and is connected to the network.
At the printer control panel, log in as a system administrator.
Press the Log In button.
Touch or type admin.
Type the administrator password, then touch OK.
Note: Depending on when the device was manufactured, the default password may be the device serial number or 1111.
Press the Home button.
Touch Device > Connectivity > Wi-Fi.
If Wi-Fi is Off, turn it on.
To toggle Wi-Fi from Off to On, touch the Wi-Fi toggle button.
To activate your Wi-Fi setting changes, press the Home button.
At the prompt, touch Restart Now.
After the printer restarts, touch Device > Connectivity > Wi-Fi.
Touch Manual Setup.
Touch Wi-Fi Protected Setup (WPS).
NOTE: If Wi-Fi Protected Setup (WPS) is not visible, at the top of the screen, touch Manual Setup.Touch PBC.
Touch OK.
On the wireless router, press the WPS button. The router broadcasts setup information for 120 seconds.
NOTE: If the wireless router does not have a physical PBC button, use your computer to select the virtual button in the router control panel. For details, refer to your router documentation.To activate your Wi-Fi setting changes, restart the printer.
Press the Home button.
At the prompt, touch Restart Now.
After the printer restarts, wait two minutes, then to get the network information that includes the IP address, print a Configuration Report. See the Related Content for information on how to print a Configuration Report.
To connect to a WPS wireless network using PINoption:
NOTE: Before you install the printer, ensure that you connect and configure the wireless router for the network.
At the printer control panel, log in as a system administrator.
Press the Log In button.
Touch or type admin.
Type the administrator password, then touch OK.
Note: Depending on when the device was manufactured, the default password may be the device serial number or 1111.
Press the Home button.
Touch Device > Connectivity > Wi-Fi.
If Wi-Fi is off, turn it on.
To toggle Wi-Fi from Off to On, touch the Wi-Fi toggle button.
To activate your Wi-Fi setting changes, press the Home button.
At the prompt, touch Restart Now.
NOTE: The following steps can vary with different router manufacturers. For details, refer to your router documentation. Additionally, in many environments, non-administrator users will not have access to the router's internal WPS settings pages. If that is the case, contact your network administrator or Internet service provider or select another connection method.
At your computer, open the wireless router control panel, then select Add WPS Client.
Select PIN Method. The wireless router control panel opens to a dialog box ready for the PIN number.
At the printer control panel, touch Device > Connectivity > Wi-Fi.
Touch Manual Setup.
Touch Wi-Fi Protected Setup (WPS).
NOTE: If Wi-Fi Protected Setup (WPS) is not visible, at the top of the screen, touch Manual Setup.Touch PIN.
Record the PIN from the screen, then touch OK. The printer starts advertising using the displayed PIN Code.
NOTE: The printer continues to advertise for 120 seconds. If the printer does not locate the wireless router within 120 seconds, the connection attempt stops.At your computer, in the wireless router control panel Client PIN Code field, enter the PIN code, then click Next. The printer communicates with the wireless router to resolve setup and configuration information. When the printer has the correct information, it connects to the router and restarts with the proper setup and configuration information. If the router does not connect with the printer within 120 seconds, the connection attempt stops.
After the printer restarts, wait 20 seconds, then to get the network information that includes the IP address, print a Configuration Report. See the Related Content for information on how to print a Configuration Report.
Method 3: Connect to a Wireless Network Manually
You can configure the printer to connect to a wireless network manually using the printer's Embedded Web Server or from the printer's Control Panel.
NOTE: To use the Embedded Web Server to set up the printer on a wireless network, connect the printer to your computer through an Ethernet wired network.
To connect to a wireless network manually using theEmbedded Web Server:
Connect the printer to your computer through an Ethernet wired network.
Access the printer's Embedded Web Server and log in as a System Administrator.
From your computer or network-connected device (on the same network as the printer) open a Web browser.
In the Web browser address field, enter the IP address of your printer and then press Enter. The Embedded Web Server home page will be displayed.
Click on the Log In button at the top, right of the page. The User Accounts window will be displayed.
Click on admin.
Enter the System Administrator password in the field provided, and then click on the Log In button.
Note: The default password is 1111.
Click Connectivity.
For Connections, click Wi-Fi.
In the SSID field, enter the network SSID (name).
To select the Network Type, from the menu, select Infrastructure or AdHoc.
NOTE: The Infrastructure network type provides the greatest selection of security options. AdHoc provides only WEP encryption in most networks.To select Encryption, for Security Settings, select the appropriate security option for your router.
To remove the dots in the Passcode fields, select the dots, then press the backspace key.
In the Passcode field, enter the network passcode.
In the Retype Passcode field, reenter the network passcode.
Click OK.
To activate your changes, at the prompt, click Restart Now.
Disconnect the Ethernet cable from the printer.
NOTE: When the printer restarts, it uses the information from the Embedded Web Server to connect with the wireless router.After the printer restarts, wait two minutes, then to get the network information that includes the IP address, print a Configuration Report. See the Related Content for information on how to print a Configuration Report.
If the printer does not successfully connect with the wireless network, check your network information and try again.
To connect to a wireless network manually from thecontrol panel:
At the printer control panel, log in as a system administrator.
Press the Log In button.
Touch or type admin.
Type the administrator password, then touch OK.
Note: Depending on when the device was manufactured, the default password may be the device serial number or 1111.
Press the Home button.
Touch Device > Connectivity > Wi-Fi.
If Wi-Fi is Off, turn it on.
To toggle Wi-Fi from Off to On, touch the Wi-Fi toggle button.
To activate your Wi-Fi setting changes, press the Home button.
At the prompt, touch Restart Now.
After the printer restarts, touch Device > Connectivity > Wi-Fi.
To connect to a network:
Touch the name of the network, enter the password for the selected network, then touch OK.
If the desired network does not appear, touch Manual Setup, then configure the wireless network settings.
For Enter the Network Name (SSID), type the name (SSID) of your network, then press OK.
Touch Security, then select the security method that your wireless network uses.
Touch Enter Password, then enter the password for your wireless network.
Touch OK.
To activate your Wi-Fi setting changes, press the Home button.
At the prompt, touch Restart Now.
After the printer restarts, wait two minutes, then to get the network information that includes the IP address, print a Configuration Report. See the Related Content for information on how to print a Configuration Report.